This article is for implementation on the iOS side , if you are looking for the backend implementation part, check out this book!
In WWDC 2019, Apple has announced a new privacy-focused mechanism for user to sign in on third party app, named "Sign in with Apple" (SiwA). If your app currently allows user to sign in with third party providers such as Facebook, Google, Twitter etc, you will also need to add a "Sign in with Apple" option for user, failure to comply might result in rejection during App Review.
According to this Apple guide, existing apps in App Store has a deadline of April 2020 to implement SiwA, and new app submitted to App Store (after September 2019) must implement SiwA if the app supports other third party logins.
Starting today, new apps submitted to the App Store must follow these guidelines. Existing apps and app updates must follow them by April 2020.
And from App Store review guideline, your app does not need to implement SiwA if your app exclusively uses your company own login system.
Sign in with Apple is not required if:
Your app exclusively uses your company’s own account setup and sign-in systems.
Your app is an education, enterprise, or business app that requires the user to sign in with an existing education or enterprise account.
Your app uses a government or industry-backed citizen identification system or electronic ID to authenticate users.
Your app is a client for a specific third-party service and users are required to sign in to their mail, social media, or other third-party account directly to access their content.
Table of contents
- Prerequisite
- Enable Sign-in with Apple in App Identifier
- Enable Sign-in with Apple capability in Xcode
- Setting up SIWA button UI
- Setting up Sign-in with Apple dialog
- Subsequent sign in
- Apple ID sign in status changes notification
- Backend implementation
Prerequisite
To implement Sign in With Apple, you must have a paid Apple developer account. As the Sign in With Apple button is a custom UIControl, we can't create it in Storyboard / XIB, we would have to create it in code and add constraints to it programmatically, I recommend reading a bit on how to create UI / constraint programmatically if you are not farmiliar with it yet.
Enable Sign-in with Apple in App Identifier
If you are creating a new app, I recommend going to Apple developer center and create a new app identifier with Sign-in With Apple capability enabled.
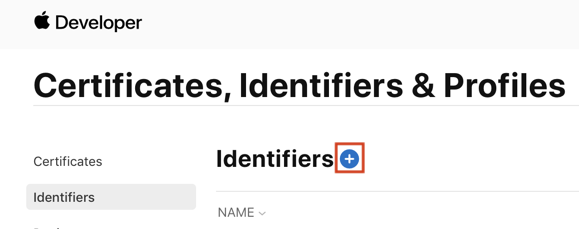
Head over to Apple developer center, select "Certificates, Identifier and Profiles",
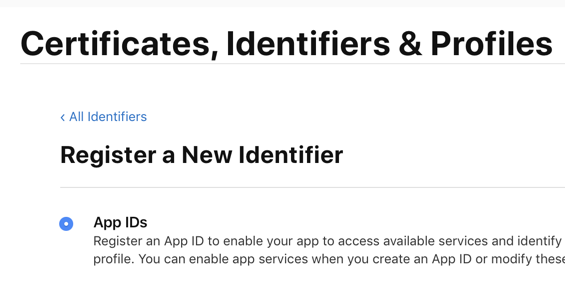
Select "Identifier" and click "+" to add a new identifier, then select "App ID".
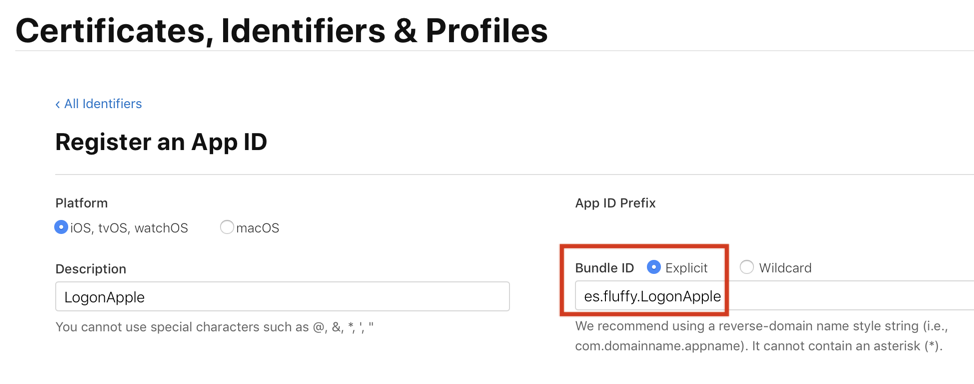
Ensure the bundle ID is explicit, and use the same Bundle ID in the Xcode project :
In the "Register an App ID" page, scroll down and find "Sign-in with Apple" capability, then check the box :
Click "Continue" to create the App ID.
If you already have an existing app, select the corresponding App Identifier in the Identifiers list, and check the "Sign-in with Apple" capability and click "Save".
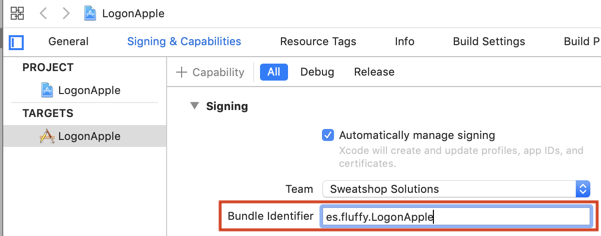
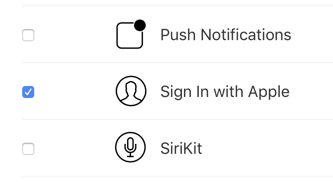
Enable Sign-in with Apple capability in Xcode
Next, open up your Xcode project, select your project in the left side bar, then in the "Signing & Capabilities" tab, click "+" and select "Sign in with Apple".
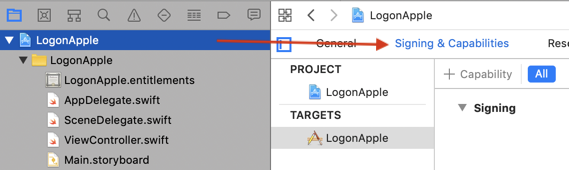
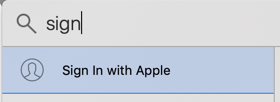
This capability would allow your app to use the "Sign-in with Apple" feature.
Setting up SIWA button UI
To use "Sign-in with Apple" function, you have to use the specially designated ASAuthorizationAppleIDButton class, you can't use your own custom button or risk rejection by App Review team.
Unfortunately there's no storyboard / XIB option for this button, we have to add it programmatically to our view controller / view.
We have to import the AuthenticationServices before using SIWA :
import AuthenticationServices

class ViewController: UIViewController {
  //...
}
Then in viewDidLoad() function, add the sign-in with Apple button :
override func viewDidLoad() {
super.viewDidLoad()
// Do any additional setup after loading the view.
let siwaButton = ASAuthorizationAppleIDButton()
// set this so the button will use auto layout constraint
siwaButton.translatesAutoresizingMaskIntoConstraints = false
// add the button to the view controller root view
self.view.addSubview(siwaButton)
// set constraint
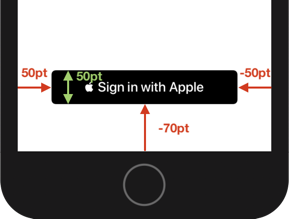
NSLayoutConstraint.activate([
siwaButton.leadingAnchor.constraint(equalTo: view.safeAreaLayoutGuide.leadingAnchor, constant: 50.0),
siwaButton.trailingAnchor.constraint(equalTo: view.safeAreaLayoutGuide.trailingAnchor, constant: -50.0),
siwaButton.bottomAnchor.constraint(equalTo: view.safeAreaLayoutGuide.bottomAnchor, constant: -70.0),
siwaButton.heightAnchor.constraint(equalToConstant: 50.0)
])
// the function that will be executed when user tap the button
siwaButton.addTarget(self, action: #selector(appleSignInTapped), for: .touchUpInside)
}
// this is the function that will be executed when user tap the button
@objc func appleSignInTapped() {
}
Looking good! When user tap on the button, the appleSignInTapped() method will be executed. Currently it doesn't do anything, we will implement this function next.
Setting up Sign-in with Apple dialog
We want to show the Sign-in with Apple system dialog when user tap on the button, which is the ASAuthorizationController .
To show this dialog, we need to supply ASAuthorizationAppleIDRequest to the initializer of the ASAuthorizationController, which can be obtained using ASAuthorizationAppleIDProvider.
@objc func appleSignInTapped() {
    let provider = ASAuthorizationAppleIDProvider()
    let request = provider.createRequest()
    // request full name and email from the user's Apple ID
    request.requestedScopes = [.fullName, .email]

    // pass the request to the initializer of the controller
    let authController = ASAuthorizationController(authorizationRequests: [request])

    // similar to delegate, this will ask the view controller
    // which window to present the ASAuthorizationController
    authController.presentationContextProvider = self

  	// delegate functions will be called when user data is
    // successfully retrieved or error occured
    authController.delegate = self

    // show the Sign-in with Apple dialog
    authController.performRequests()
}
We are requesting fullName and email information of the user by specifying it on requestedScopes.
If we build and run the app, we will get an error, because we haven't implemented the presentationContextProvider and delegate protocol yet.
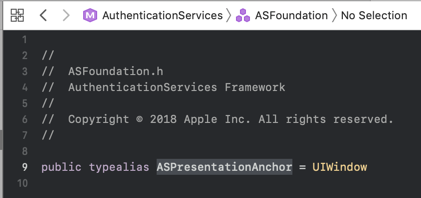
presentationContextProvider (ASAuthorizationControllerPresentationContextProviding) asks for which window should the authorization dialog appear, this is in case for app that has multiple window on iPadOS.
Usually we will want to present the authorization dialog on the window where user press the "sign in with Apple" button, so we will return self.view.window for the context provider.
presentationContextProvider protocol has only one function, presentationAnchor(for controller:), which returns a ASPresentationAnchor, which is actually UIWindow.
We will implement this protocol like this :
// ViewController.swift

extension ViewController : ASAuthorizationControllerPresentationContextProviding {
    func presentationAnchor(for controller: ASAuthorizationController) -> ASPresentationAnchor {
        // return the current view window
        return self.view.window!
    }
}
Next, we will implement the delegate (ASAuthorizationControllerDelegate), which includes two methods that will be called when the sign in is successful (with user data) or failed (with error).
extension ViewController : ASAuthorizationControllerDelegate {
    func authorizationController(controller: ASAuthorizationController, didCompleteWithError error: Error) {
        print("authorization error")
        guard let error = error as? ASAuthorizationError else {
            return
        }

        switch error.code {
        case .canceled:
            // user press "cancel" during the login prompt
            print("Canceled")
        case .unknown:
            // user didn't login their Apple ID on the device
            print("Unknown")
        case .invalidResponse:
            // invalid response received from the login
            print("Invalid Respone")
        case .notHandled:
            // authorization request not handled, maybe internet failure during login
            print("Not handled")
        case .failed:
            // authorization failed
            print("Failed")
        @unknown default:
            print("Default")
        }
    }

    func authorizationController(controller: ASAuthorizationController, didCompleteWithAuthorization authorization: ASAuthorization) {

        if let appleIDCredential = authorization.credential as? ASAuthorizationAppleIDCredential {
            // use the user credential / data to do stuff here ...
        }
    }
}
If the sign in fails with error, authorizationController(controller: ASAuthorizationController, didCompleteWithError error: Error) will be called and you can handle error inside that function.
If the sign in is successful, authorizationController(controller: ASAuthorizationController, didCompleteWithAuthorization authorization: ASAuthorization) will be called, with the user credential stored in ASAuthorization.
The reason we used the code if let appleIDCredential = authorization.credential as? ASAuthorizationAppleIDCredential , is to cast the authorization credential as ASAuthorizationAppleIDCredential. There's other type of credentials such as Single-Sign-On for enterprise (ASAuthorizationSingleSignOnCredential), or password based credential (ASPasswordCredential).
Here's some few examples of user data you can use on the credential :
func authorizationController(controller: ASAuthorizationController, didCompleteWithAuthorization authorization: ASAuthorization) {

    if let appleIDCredential = authorization.credential as? ASAuthorizationAppleIDCredential {
        // unique ID for each user, this uniqueID will always be returned
        let userID = appleIDCredential.user

        // optional, might be nil
        let email = appleIDCredential.email

        // optional, might be nil
        let givenName = appleIDCredential.fullName?.givenName

        // optional, might be nil
        let familyName = appleIDCredential.fullName?.familyName

        // optional, might be nil
        let nickName = appleIDCredential.fullName?.nickname

        /*
            useful for server side, the app can send identityToken and authorizationCode
            to the server for verification purpose
        */
        var identityToken : String?
        if let token = appleIDCredential.identityToken {
            identityToken = String(bytes: token, encoding: .utf8)
        }

        var authorizationCode : String?
        if let code = appleIDCredential.authorizationCode {
            authorizationCode = String(bytes: code, encoding: .utf8)
        }

      // do what you want with the data here
    }
}
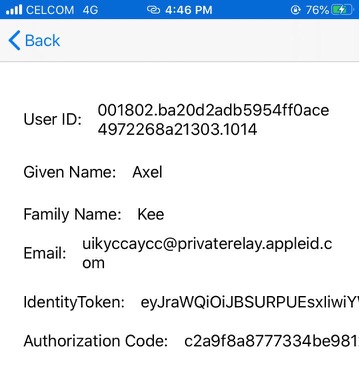
The reason email and name might be nil is that user might decline to reveal these information during the Apple sign-in prompt, or the user has already signed in previously, which we will discuss in the next section.
If user choose to hide their email, Apple will generate a private relay email address for them , which ends with @privaterelay.apple.id.com , you can send email to this email address and Apple will forward it to the actual user's email.
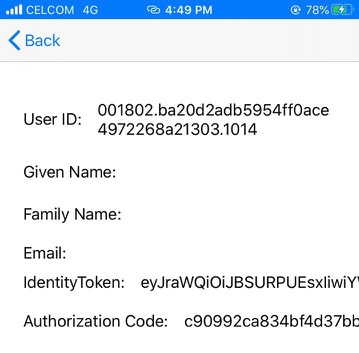
Subsequent sign in
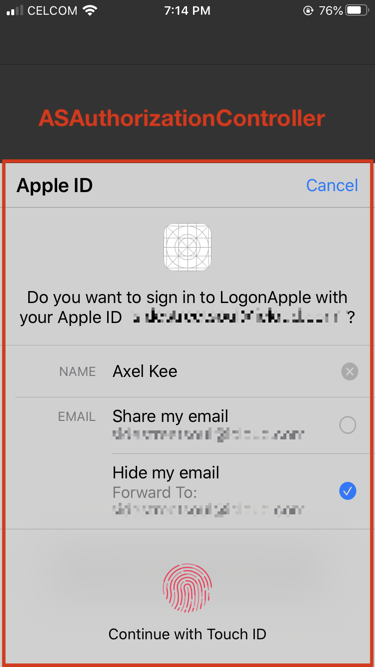
If a user has previously signed in to your app using Apple ID, and they tap on the "Sign in with Apple" button again, the dialog will look different :

And when user sign in this time, didCompleteWithAuthorization will be called as expected, but the email and name will be nil, as Apple expects your app to have already store the user's name and email when user first logged in.
This behaviour is confirmed by Apple staff in this disccusion : https://forums.developer.apple.com/thread/121496#379297
This behaves correctly, user info is only sent in the ASAuthorizationAppleIDCredential upon initial user sign up. Subsequent logins to your app using Sign In with Apple with the same account do not share any user info and will only return a user identifier in the ASAuthorizationAppleIDCredential.
--- Patrick
If you are in the midst of developing your app's login system, it can be annoying to get nil name/email returned, and creating a new Apple ID each time you test the Sign-in with Apple feature is not practical. Even deleting the app and installing again won't make your app able to retrieve back the name and email attributes of user.
Fortunately, we can reset this behaviour by revoking the Apple Sign-In permission in the Settings app.
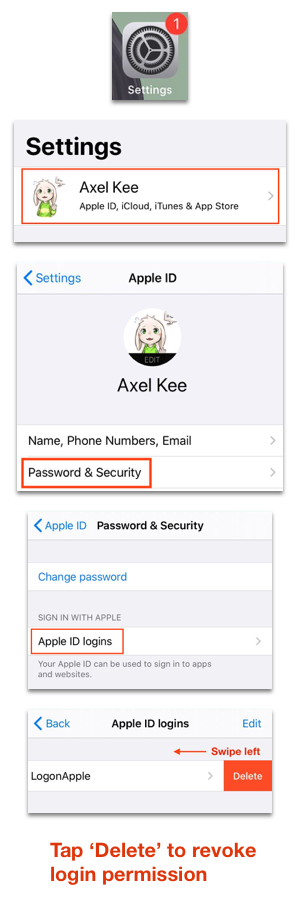
After revoking the Apple ID login on the app, when we sign in again, it will show the authorization prompt we saw on first time login :
And now we can retrieve the user's name and email again! You just need to go to Settings and revoke the app's Apple login permission to reset back the state.
Check if user has logged in before
If the user has already logged in previously, it would make sense to show user the main view instead of the log in view again. How can we check if the user has previously logged in using Apple ID?
One simple way to do this is to save the userID retrieved from Apple Sign-in into UserDefaults when user first logged in with Apple ID :
// successful login
func authorizationController(controller: ASAuthorizationController, didCompleteWithAuthorization authorization: ASAuthorization) {

    if let appleIDCredential = authorization.credential as? ASAuthorizationAppleIDCredential  {
        // unique ID for the user
        let userID = appleIDCredential.user

        // save it to user defaults
        UserDefaults.standard.set(appleIDCredential.user, forKey: "userID")
    }
}
and when user open the app next time, do a check on the user defaults value. If there is already a userID set, move to the main view :
// on the initial view controller or somewhere else, check the userdefaults
if let userID = UserDefaults.standard.string(forKey: "userID") {
		// move to main view
    performSegue(withIdentifier: "LoginToMainViewSegue", sender: user)
}
Wait, remember in previous section, we can revoke the Apple Sign-in permission in the Settings app? What if user goes to the Settings app and revoke their login, but we already saved the userID in UserDefaults? 😬
Fortunately, Apple has provided us a function to check the Apple Sign-in status, ASAuthorizationAppleIDProvider().getCredentialState(forUserID: ) . We can check the sign in status for a user using the userID retrieved earlier.
 if let userID = UserDefaults.standard.string(forKey: "userID") {

    // get the login status of Apple sign in for the app
    // asynchronous
    ASAuthorizationAppleIDProvider().getCredentialState(forUserID: userID, completion: {
        credentialState, error in

        switch(credentialState){
        case .authorized:
            print("user remain logged in, proceed to another view")
            self.performSegue(withIdentifier: "LoginToUserSegue", sender: nil)
        case .revoked:
            print("user logged in before but revoked")
        case .notFound:
            print("user haven't log in before")
        default:
            print("unknown state")
        }
    })
}
You can do this check before the login view is presented, perhaps AppDelegate.
Apple ID sign in status changes notification
This scenario is highly unlikely but still possible, what if in the midst of using your app, the user go to the Settings app and revoke the Apple sign-in for your app and return to your app? How can your app notice the status changes?
Your app can observe notification with name ASAuthorizationAppleIDProvider.credentialRevokedNotification in NotificationCenter to check if user has revoked the sign-in status.
// in your view controller or app delegate
override func viewDidLoad() {
    super.viewDidLoad()

    // call the function appleIDStateRevoked if user revoke the sign in in Settings app
    NotificationCenter.default.addObserver(self, selector: #selector(appleIDStateRevoked), name: ASAuthorizationAppleIDProvider.credentialRevokedNotification, object: nil)
}
@objc func appleIDStateRevoked() {
    // log out user, change UI etc
}
Backend Implementation
No idea how to proceed on implementing the backend part of Sign in With Apple? Check out the sample chapters of Practical step-by step guide of implementing SIWA with sample code (In Ruby, PHP, Python, NodeJS)!
Sample Chapters of Practical Sign in with Apple
