iOS 13 does bring a lot of exciting feature like Dark mode, Multi-tasking, Sign in with Apple etc. Other than exciting feature, iOS 13 SDK also bring some breaking changes as well, overlooking these changes might cause your app to behave differently as expected 😅. This article will go through some breaking changes I have found and workaround for it.
Table of contents :
- Modal presentation
- Large title navigation bar appearance
- Push notification
- Adapting or Opting out of Dark mode
- System Font
- Further Reading
Modal presentation
If you have used modal presentation for view controller prior to iOS 13, the default behavior is presenting the modal view controller in full screen, and when the modal view controller is dismissed, the viewDidAppear function will be called on the presenting view controller (ie. the view controller that is responsible for presenting the modal view controller).
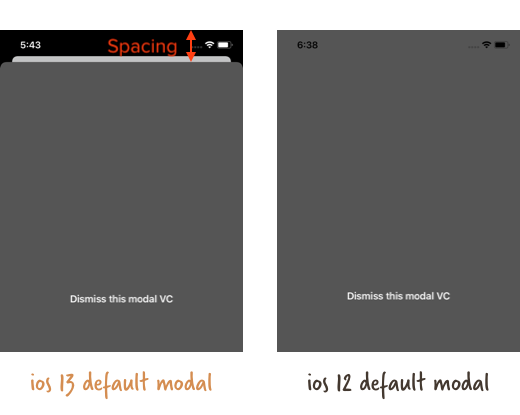
However in iOS 13, the default behavior of presenting the modal view controller is replaced with a card-like animation (the official term for it is page sheet) :
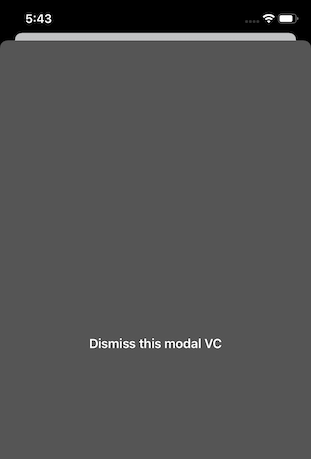
The card modal view in iOS 13 has shorter height than the full screen modal in iOS 12 (and previous iOS versions).
By default, user can swipe down the presented card modal view in iOS 13 to dismiss it. This may cause issue if your application flow is to dismiss the modal programmatically only after user has completed certain actions.
And after the dismissal, the viewDidAppear function will not be called on the presenting view controller (the view controller that presents the modal), if you are doing UI changes in this function, those changes might not be implemented!
Sticking to previous full screen modal behaviour
If you want to preserve the old full screen modal behaviour, you can set the modal presentation style to "full-screen" (previous iOS versions before), instead of using the default.
To set it programmatically, set the modally presented view controller's .modalPresentationStyle property to .fullscreen .
@IBAction func presentModalTapped(_ sender: Any) {
    let detailVC = UIStoryboard(name: "Main", bundle: nil).instantiateViewController(identifier: "DetailViewController")

    // use back the old iOS 12 modal full screen style
    detailVC.modalPresentationStyle = .fullScreen

    self.present(detailVC, animated: true, completion: nil)
}
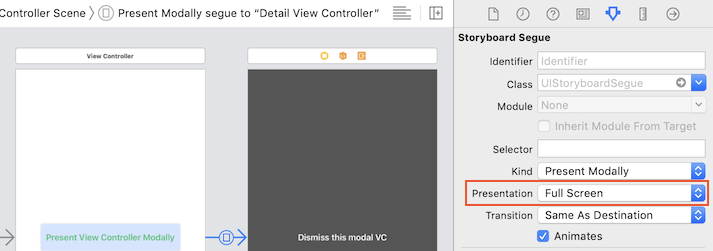
If you are doing the presentation using segue in Storyboard, select the segue, and change it to "fullscreen"
Preventing user to dismiss
Say you want to adopt the new card-like modal presentation style, but don't want user to be able to swipe down to dismiss, simple set the modal's isModalInPresentation to true (default is false).
// the VC being presented modally
// disallow user to swipe down to dismiss

if #available(iOS 13.0, *) {
  // this property is available for iOS 13 and above only
  detailVC.isModalInPresentation = true
}
The default value of this property is false. When you set it to true, UIKit ignores events outside the view controller's bounds and prevents the interactive dismissal of the view controller while it is onscreen.
New delegate method for presentation controller
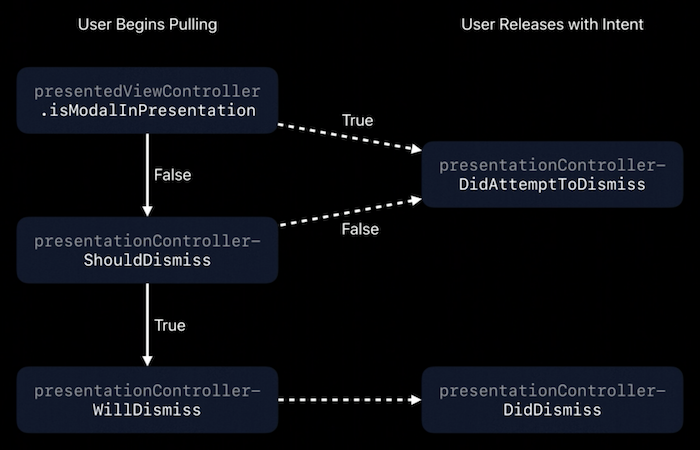
If you use the new modal presentation style and wants to execute code when user dismiss the modal, you can't rely on the "viewDidAppear" function on the presenting view controller. Fortunately, Apple has added a few new method to the protocol UIAdaptivePresentationControllerDelegate.
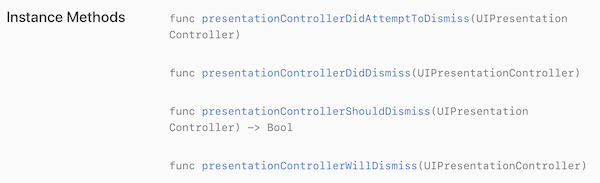
Sarun has written an excellent guide on explaining how to use these delegate functions here, I recommend reading his guide on this matter.
Large title navigation bar appearance
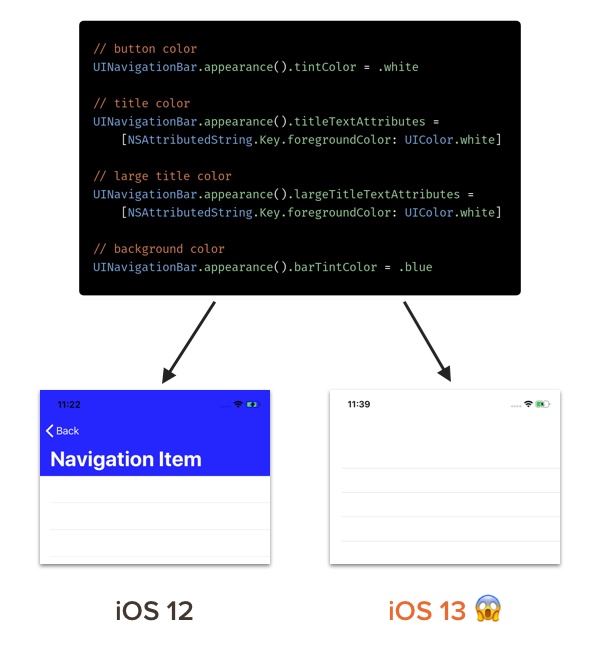
Prior to iOS 13, you might have used UINavigationBar.appearance() to change the color / font of the navigation bar like this :
 // button color
UINavigationBar.appearance().tintColor = .white

// title color
UINavigationBar.appearance().titleTextAttributes =
    [NSAttributedString.Key.foregroundColor: UIColor.white]

// large title color
UINavigationBar.appearance().largeTitleTextAttributes =
    [NSAttributedString.Key.foregroundColor: UIColor.white]

// background color
UINavigationBar.appearance().barTintColor = .blue
If you used the same code to build for iOS 13, you might find that your large title navigation bar doesn't follow the styling at all! 😱
In iOS 13, Apple has introduced a new class, UINavigationBarAppearance, to replace the old UINavigationBar.appearance() approach. Here's an example :
if #available(iOS 13, *) {
  let appearance = UINavigationBarAppearance()

  // title color
  appearance.titleTextAttributes = [.foregroundColor: UIColor.white]

  // large title color
  appearance.largeTitleTextAttributes = [.foregroundColor: UIColor.white]

  // background color
  appearance.backgroundColor = .blue

  // bar button styling
  let barButtonItemApperance = UIBarButtonItemAppearance()
  barButtonItemApperance.normal.titleTextAttributes = [.foregroundColor: UIColor.white]

  appearance.backButtonAppearance = barButtonItemApperance

  // set the navigation bar appearance to the color we have set above
  UINavigationBar.appearance().standardAppearance = appearance

  // when the navigation bar has a neighbouring scroll view item (eg: scroll view, table view etc)
  // the "scrollEdgeAppearance" will be used
  // by default, scrollEdgeAppearance will have a transparent background
  UINavigationBar.appearance().scrollEdgeAppearance = appearance
}

// the back icon color
UINavigationBar.appearance().tintColor = .white
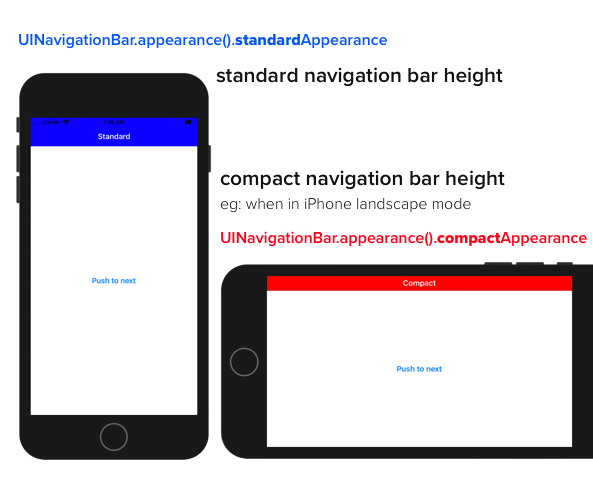
The new UINavigationBarAppearance has added in three mode of appearance, standard, compact and scrollEdgeAppearance. Each mode can have different styling / coloring.
Standard appearance is the normal navigation bar we see on portrait iPhone / iPad, compact appearance is the shorter navigation bar we see on landscape iPhone (and some other scenario). Scroll edge appearance is the appearance when a large title navigation bar is used with a scroll view right below it, and when the user haven't scroll it yet. Once user scroll the scrollview, a standard appearance will be used.
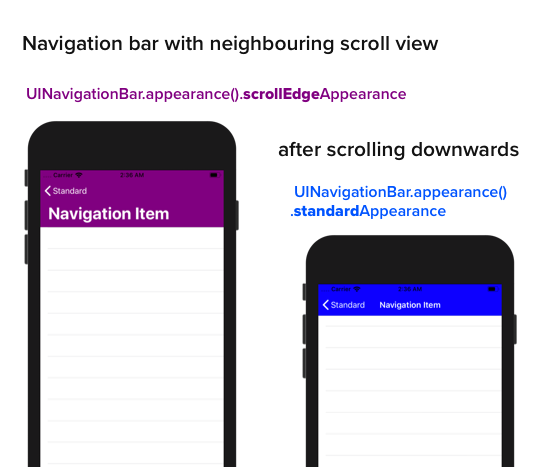
If you didn't specify an appearance for scrollEdgeAppearance, iOS by default will use a transparent background for it, so that you can see the content below scrolling through it. Hence you saw the blanked out navigation bar on iOS 13 earlier on.
To change the appearance of bar button in navigation bar, we can use UIBarButtonItemAppearance() object, then assign it to the navigation appearance like this :
let appearance = UINavigationBarAppearance()

let barButtonItemApperance = UIBarButtonItemAppearance()

// ... do your styling here

// appearance for both button
appearance.buttonApperance

// appearance for back button
appearance.backButtonAppearance = barButtonItemApperance

// appearance for done button
appearance.doneButtonAppearance
One thing to take notice is that even after setting back button appearance, the back arrow icon color doesn't get styled, only the "back" text on the back button get styled.
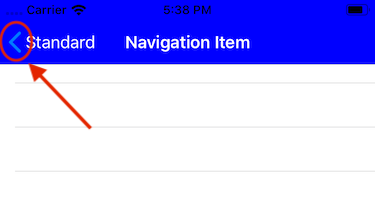
So far the solution I have found for this is using the good 'ol UINavigationBar.appearance().tintColor = .white to change the color of the back button arrow.
Push notification
Sending push notification
According to Apple's documentation, the header apns-push-type is required for sending push notification (to Apple Push Server) for WatchOS 6 or later, and is recommended for iOS, macOS app as well.
(Required for watchOS 6 and later; recommended for macOS, iOS, tvOS, and iPadOS) The value of this header must accurately reflect the contents of your notification’s payload. If there is a mismatch, or if the header is missing on required systems, APNs may return an error, delay the delivery of the notification, or drop it altogether.
apns-push-type has 6 valid values (as of 2 October 2019), which indicate the type of push :
- alert
- background
- voip
- complication
- fileprovider
- mdm
Push notification device token
In your AppDelegate, if you are retrieving push notification device token string using the .description method like this :
// ⚠️ Please don't do this
func application(_ application: UIApplication, didRegisterForRemoteNotificationsWithDeviceToken deviceToken: Data) {
  let tokenData = deviceToken as NSData
  let token = tokenData.description

  let deviceToken = "\(token)".replacingOccurrences(of: " ", with: "")
                              .replacingOccurrences(of: "<", with: "")
                              .replacingOccurrences(of: ">", with: "")

  // then send your token to server...
}
This will not work in iOS 13 as Apple has changed the output for the .description method for objects.
// iOS 12
(deviceToken as NSData).description // "<789dc438 6d688f2c e2dd66d8 0d335454 5ce29f0f ed71234a f6b37ddb 8a504523>"

// iOS 13
(deviceToken as NSData).description // "{length = 32, bytes = 789dc438 6d688f2c ... f6b37ddb 8a504523 }"

// the same regex method won't work on iOS 13
The solution for this is to read each byte of DeviceToken (as it is a NSData object, it contains sequence of bytes) and combining all the bytes.
let deviceTokenString = deviceToken.map { String(format: "%02x", $0) }.joined()
Matt from NSHipster has written an excellent guide addressing this issue, here's an excerpt on how the device token reading works :
- The
mapmethod operates on each element of a sequence. BecauseDatais a sequence of bytes in Swift, the passed closure is evaluated for each byte indeviceToken. - The
String(format:)initializer evaluates each byte in the data (represented by the anonymous parameter$0) using the%02xformat specifier, to produce a zero-padded, 2-digit hexadecimal representation of the byte / 8-bit integer. - After collecting each byte representation created by the
mapmethod,joined()concatenates each element into a single string.
If you are using external service for push notification (such as OneSignal etc), it might be good idea to contact their support to check if their SDK code is using the description method for device token retrieval, if yes, then they would have to change it for iOS 13.
Adapting or Opting out of Dark mode
At the time of writing this article, one of my iOS app Rapidly , which was last updated in May 2019, looks like this in iOS 13 Dark mode :
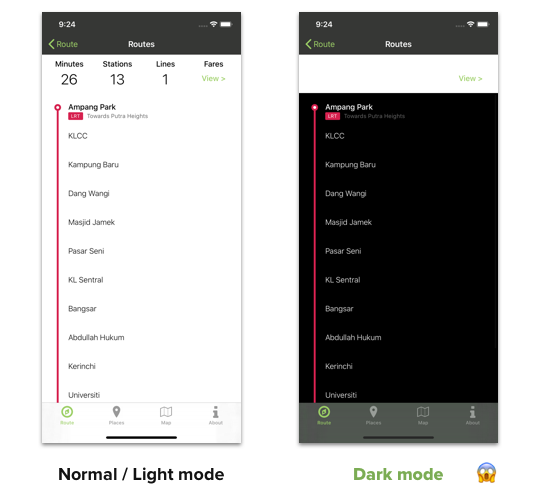
As you can see, the section on top showing "Minutes", "Stations", "Lines" and Fares become invisible (actually is the text color become white and the background remain unchanged as white). This happens because I used the default color for the label in Storyboard before iOS 13, and used a custom white color for the background color. The iOS 13 dark mode will change the default label color from black to white and the default background color from white to black, while other custom color (not using system or default) will stay the same.
Federico has written a fantastic article on how to adopt to Dark Mode here, I definitely recommend reading this!
If you are using Storyboard, one of the simplest way to adopt Dark mode is to try to use as much System Color palette as possible.
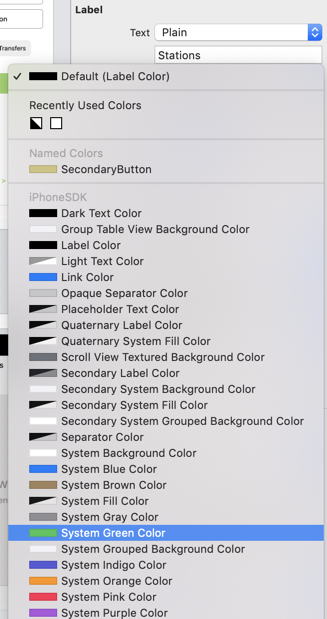
Using system colors, iOS will auto adjust the color when dark mode is used. Say the "Label color" which appear black in normal / light mode, will appear as white in dark mode.
If you are using code, you can use UIColor.systemBlue, UIColor.systemGreen, UIColor.systemGray etc.
Assets
If you are using custom icon / image in your app, you might need to create another set of icon/image with different color scheme in the assets folder.
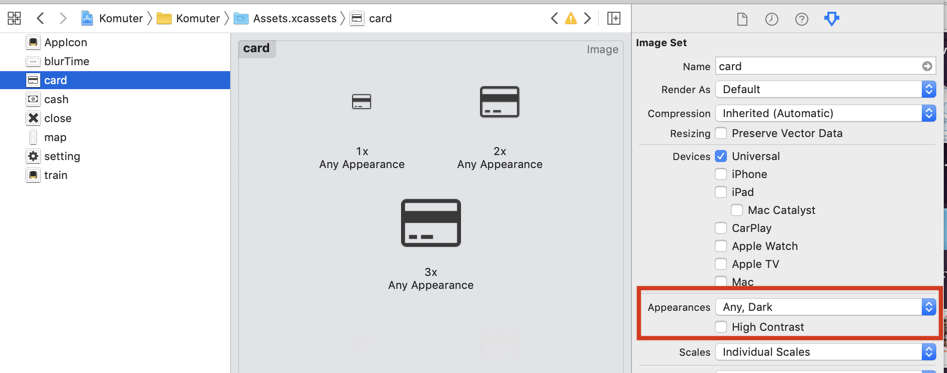
Select "Any, Dark" or "Any, Light, Dark" in the Appearances field, then Xcode will create another set of asset placeholder for the Dark appearance, you can then put your icon in lighter color scheme here.
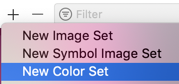
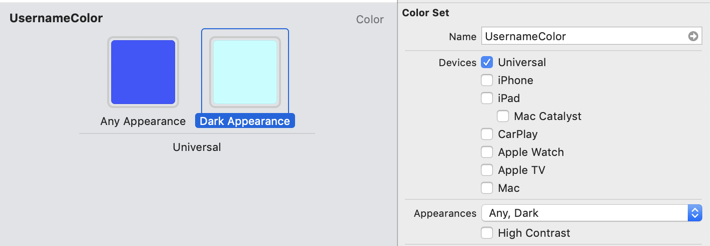
You can also use Named Color in Assets catalog (since iOS 11 and above), then you can select different color for different appearance easily.
iOS will auto select the correct set of assets to use depending if Dark mode is activated or not.
Don't use dark mode for certain view / view controllers
Sometimes it might not make sense to use a different color for a view, you can add some code to tell iOS to always display a view with light / dark mode using .overrideUserInterfaceStyle like this :
let lightView = UIView()
lightView.overrideUserInterfaceStyle = .light

// this view will always be in light mode
UIViewController and UIWindow also has this property, setting it in view controller / window level will make their child views adapt this override value as well.
Opt out of dark mode altogether
If it makes no sense to add dark mode to your app (or if you are just too lazy to support it 🙈), you can make your app opt out of dark mode entirely (meaning your app looks the same like in light mode when user has enabled dark mode in their phone).
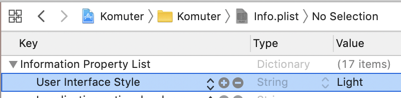
To opt out, add a key "User Interface Style" with string value "Light" in the Info.plist file.
System Font
In the WWDC 2019 video Font Management and Text Scaling, Apple mentioned we should not instantiate system fonts using name (02:45).

Say if you instantiate a UIFont with a font name that starts with a dot ("."),
// San Francisco system font
let font = UIFont(name: ".SFUI-Regular", size: 24.0)

label.font = font!
// iPhone will show you a Times New Roman font, lol
This will work in iOS 12 but not on iOS 13 (and onwards). You will get a strange Times New Roman font on your label if you do this.

Even if you get the font name from a system font and initialize it using that name, you will still get the same result.
// even if you use the font name of San Francisco system font
let font = UIFont(name: UIFont.systemFont(ofSize: 24.0).fontName, size: 24.0)

label.font = font!
// iPhone will still show you a Times New Roman font, lol
The correct way to get system font from iOS 13 is to always use UIFont.systemFont(ofSize: , weight: ) directly.
let font = UIFont.systemFont(ofSize: 24.0)
label.font = font

// This will show a nice System font

If you are using CTFont (for some low level use case), you can create a system font using CTFontCreateWithFontDescriptor() method, and pass in the system font like this :
CTFontCreateWithFontDescriptor(UIFont.systemFont(ofSize: 18.0).fontDescriptor, 0, nil)
Reddit source thread: https://www.reddit.com/r/iOSProgramming/comments/d05r77/how_do_i_create_a_ctfont_object_for_the_san/
Further reading
Apple's WWDC video on modernizing app for iOS13
Apple's WWDC video on Font management
Sarun's article on Modality changes in iOS 13
Federico's article on adopting dark mode
And also searching "ios 13" in StackOverflow will uncover more breaking changes you didn't knew previously 😂 (eg: like the link color in NSAttributedString)
