There might be case where your app have a database containing preset static information that won’t be modified, added or deleted by user. The database will only be used for querying or searching, how do we embed a database prepopulated with data into the app when user first install the app?
In this post, we will be using embed Realm database for storing preset static data. “Why not Core Data? We should use as less third party dependencies as possible!”, I heard you, AppCoda has written a great post on how to use preset SQLite Database with Core Data here, I recommend their tutorial if you plan to stick on Core Data.
I have used the exact same technique to create and embed preset Realm database in my own iOS apps to show train schedule and routes, Komuter and Rapidly.
Table of Contents
- Pros and Cons of using Core Data/ Realm for prepopulated database
- The big picture of the steps
- Prerequisite
- Preparing Realm from CSV files
- Using the preset realm file in the actual app
Pros and Cons of using Core Data/ Realm for prepopulated database
The pros of using Core Data is that it is backed by Apple, means you are guaranteed that it will keep working down the road to iOS 20 and beyond, and there’s no additional size added to your app for using this library. The cons of using Core Data is that it is an Apple-only technology, if you want to share a same database file across Android and iOS app, there will be additional work required, you can use SQLite as the backing database and use CoreData on top of it, and use the SQLite package on Android to read it. In my opinion, dealing with Core Data and SQLite package can be quite intimidating and time consuming especially if you are just started with iOS development.
The pros of using Realm is that it supports both Android / iOS out of the box, you can use the same .realm database file on both Android and iOS app and it will work nicely. Realm is open source and in my opinion easier to use than Core Data, and also supports filtering / querying using NSPredicate. The cons of using Realm is that it is a third party library, MongoDB is in progress of acquiring Realm, the worst that can happen is that MongoDB shut down development of Realm immediately after acquisition and there will be no support afterwards, which is very unlikely but still a possibility. As Realm is open source, your current app shipped with Realm database will still work even after Realm company got shut down.
The big picture of the steps
For this post, we will be using a list of restaurants and the food served by each restaurants as an example of fixed database. The goal would be to generate a .realm database filled with restaurant and food data, and embed it in an actual iOS app.
The steps would be
- Prepare CSV of restaurants and food data
- Create a temporary iOS Xcode project to generate .realm database from the .csv files
- Embed the realm database file into the actual iOS app Xcode project and use it

At the end of this post, we will have an app that reads data from the preset Realm database and show it in table view like this :

Try out the CSV to Realm Xcode Project and the Realm preset database app
Get your hands on the actual code and project, saving time from having redo everything from scratch, give it a try!
https://github.com/fluffyes/csvFoodies
Prerequisite
To make things easier in this tutorial, we will be using Cocoapods to install the SwiftCSV library to read and parse CSV files, and RealmSwift Library to use Realm database. The SwiftCSV library requires Swift 4.2+ so you must use Xcode 10 or above.
Cocoapods is a handy library that help us install library / dependencies for Xcode project easily.
To install cocoapods, open up Terminal app (Open spotlight, type “Terminal”).
Then type it sudo gem install cocoapods and press Enter to install.


If you get the error message “You don't have write permissions for the /usr/bin directory.” , try use this command instead sudo gem install cocoapods -n /usr/local/bin .
This should install the Cocoapods library. After finish installing, in the Terminal, type and run the command pod repo update to update the available repositories / libraries for cocoapods.
If you would like to view your Realm database file in a nice GUI, I recommend downloading the official Realm Browser Mac app.
Preparing Realm from CSV files
To populate a Realm database file, we will use a CSV file filled with the data (you can export your data into CSV format using Excel or Pages or Google Sheet), then create a sample iOS app to convert the CSV file into Realm database.
For this post, we will prepare a restaurants.csv file which contain a list of restaurant and a food.csv which contain a list of food served by the restaurants. Each restaurant have an unique ID and the food relates to the restaurant by using a restaurant_id column.

If you are lazy to generate the csv files, you can download the restaurants.csv and food.csv.
Create a new Xcode project and select iOS. Quit Xcode, open the Terminal app, type “cd “ (put a space behind the ‘cd’ and don’t press enter yet), then drag your project folder into the terminal, then press enter.
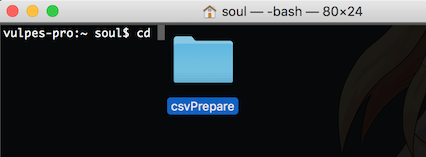
This will change the directory (“cd” = change directory) in the terminal to your current Xcode project folder. Then type pod init to create a Podfile in your Xcode project folder.

After creating the podfile, we can specify the library we want inside it, type nano Podfile to edit the Podfile, we will add ’SwiftCSV’ and ‘RealmSwift’.
It should look like this :
# Uncomment the next line to define a global platform for your project
# platform :ios, '9.0'

target 'csvPrepare' do
  # Comment the next line if you don't want to use dynamic frameworks
  use_frameworks!

  # Pods for csvPrepare
  pod 'SwiftCSV'
  pod 'RealmSwift'
end
After done editing, press Control + X to quit the editing window, then type “Y” and press enter to save the changes.
Now type pod install and press Enter to install the SwiftCSV and RealmSwift library. After installation is done, you should see a .xcworkspace file generated in the project folder, we will use this workspace file instead of the .xcodeproj file onwards. Double click the .xcworkspace file to open the iOS project.

After opening the project, we will add the CSV files (restaurants and food) into the project bundle so we can read them from code. Drag and drop the CSV files into the project, and remember to check the app as target and also ‘Copy items if needed’.
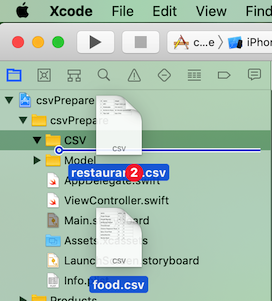
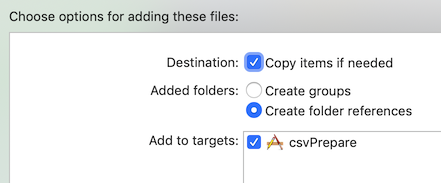
To use SwiftCSV and RealmSwift library, import them at the top of the view controller code :
import UIKit
import SwiftCSV
import RealmSwift

// default realm object
let realm = try! Realm()

class ViewController: UIViewController {
  //...
}
Declare a default realm object before the class as shown above, we will use this realm object to save data into the .realm database file later on.
In the viewDidLoad function, print the path for the default .realm database file, we will need this so that we can copy this file out and put into our real app project later on.
override func viewDidLoad() {
    super.viewDidLoad()
    // Do any additional setup after loading the view.

    print("default realm path is \(realm.configuration.fileURL?.absoluteString)")
}
If you run your app now, you should see the path to the default realm file in the console like this :

In the storyboard (or code if you prefer), add an UIButton to the view controller and link an IBAction function to it when tapped. You can name the button as you like and we will perform the realm database generation when the button is tapped.
// ViewController.swift

@IBAction func generateRealmTapped(_ sender: UIButton) {
  // read and parse CSV and generate realm file here
}
To prevent generating duplicate data if we accidentally tapped twice on the button, we can add code to clear all the data in the .realm file like this :
@IBAction func generateRealmTapped(_ sender: UIButton) {
    // clear everything in the realm in case we clicked the button twice and it adds the same data twice

    try? realm.write {
        realm.deleteAll()
    }
}
As the realm.write block might throw an error, we catch it with the try? statement and ignore any error if there is. You can read more about the difference between try, try? and try! here.
Next, we are going to create model files for the restaurant and food, this is to tell realm database the properties / attributes of them. Right click the project folder in Xcode, and select ‘New File…’ , then select ‘Swift File’.
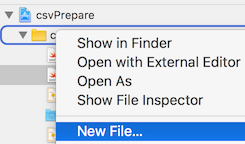
Name it as ‘Restaurant.swift’ , add the ‘’restaurantID, ’name’ , ‘slogan’, and foods attribute to this model.
It should look like this :
// Restaurant.swift

import Foundation
import RealmSwift

class Restaurant : Object {
    @objc dynamic var restaurantID = 0
    @objc dynamic var name = ""

    // slogan can be nil, as some restaurant might not have slogan
    @objc dynamic var slogan : String?

    // restaurant have many foods
    // List is used to tell Realm about one-to-many relationship
    // eg: one restaurant can have many foods
    let foods = List<Food>()

    // this function tells Realm that each restaurant is uniquely identifieable by the property "restaurantID"
    override class func primaryKey() -> String? {
        return "restaurantID"
    }
}
Create a new Swift file for Food model as well, and we add the ‘name’ and ‘price’ properties to it like this :
// Food.swift

import Foundation
import RealmSwift

class Food : Object {
    @objc dynamic var name = ""
    @objc dynamic var price = 0
}
Next, we are going to write a function (inside view controller) to read and parse the restaurants.csv file and create a new record in realm database for each row in the CSV.
// ViewController.swift

func generateRestaurantsFromCSV() {
    // get the URL to the restaurants.csv file
    guard let csvURL = Bundle.main.url(forResource: "restaurants", withExtension: "csv") else {
        print("unable to open csv")
        return
    }

    // parse the CSV file using SwiftCSV library
    guard let csv : CSV? = try? CSV(url: csvURL) else {
        print("unable to parse csv")
        return
    }

    // go through each row of the CSV file
    try? csv?.enumerateAsDict{ dict in

        // declare an empty Restaurant realm model
        let restaurant = Restaurant()

        // assign restaurantID from the CSV file to the model
        if let restaurantIDstr = dict["id"],
           let restaurantID = Int(restaurantIDstr) {
            restaurant.restaurantID = restaurantID
        }

        // assign name from the CSV file to the model
        if let name = dict["name"] {
            restaurant.name = name
        }

        // assign slogan from the CSV file to the model
        if let slogan = dict["slogan"] {
            restaurant.slogan = slogan
        }

        // save the restaurant model into the realm file
        try? self.realm.write {
            self.realm.add(restaurant)
        }
    }
}
We can then call this function in the UIButton action :
@IBAction func generateRealmTapped(_ sender: UIButton) {
    // clear everything in the realm in case we clicked the button twice and it adds the same data twice

    try? realm.write {
        realm.deleteAll()
    }

   // generate the restaurants realm data
   generateRestaurantsFromCSV()
}
Next, we will proceed to write a function for reading and parsing food.csv file and create a new record in realm database for each row in the CSV. This is similar to the previous generateRestaurantsFromCSV() function, except that it will first need to find the belonging restaurant model (ie. the restaurant where the food belongs to), so that the food data can be inserted to the restaurants’ foods list property.
func generateFoodFromCSV() {

    // get the URL to the food.csv file
    guard let csvURL = Bundle.main.url(forResource: "food", withExtension: "csv") else {
        print("unable to open csv")
        return
    }

    // parse the CSV file using SwiftCSV library
    guard let csv : CSV? = try? CSV(url: csvURL) else {
        print("unable to parse csv")
        return
    }

    // go through each row of the CSV file
    try? csv?.enumerateAsDict{ dict in
        // retrive the resaurant_id from the row
        guard let restaurantIDstr = dict["restaurant_id"],
            let restaurantID = Int(restaurantIDstr) else {
                print("unable to retrieve restaurant ID")
                return
        }

        // find the restaurant which have the restaurant_id
        guard let restaurant = self.realm.object(ofType: Restaurant.self, forPrimaryKey: restaurantID) else {
            print("unable to find Restaurant")
            return
        }

        // declare an empty Food realm model
        let food = Food()

        // assign name from the CSV file to the model
        if let name = dict["name"] {
            food.name = name
        }

        // assign price from the CSV file to the model
        if let priceStr = dict["price"],
            let price = Int(priceStr) {
            food.price = price
        }

        // append the food object into the list of foods of the restaurant and save it to realm
        try? self.realm.write {
            restaurant.foods.append(food)
        }
    }
}
Now we can put this function into the UIButton tap action :
@IBAction func generateRealmTapped(_ sender: UIButton) {
    // clear everything in the realm in case we clicked the button twice and it adds the same data twice

    try? realm.write {
        realm.deleteAll()
    }

   // generate the restaurants realm data
   generateRestaurantsFromCSV()

   // generate the food realm data
   generateFoodFromCSV()
}
Time to generate the Realm file! Build and run this demo app in the iOS Simulator, tap the generate realm button, then proceed to copy the realm path (from ‘/Users/…’ until ‘…/Documents’, excluding the ‘default.realm’) in the console.

It should look similar to this :
/Users/soulchild/Library/Developer/CoreSimulator/Devices/C73DCA3B-BCA8-4A7B-9129-6E1AAC1371F1/data/Containers/Data/Application/E2FF1484-1AFC-4844-A2AD-EADA73733883/Documents
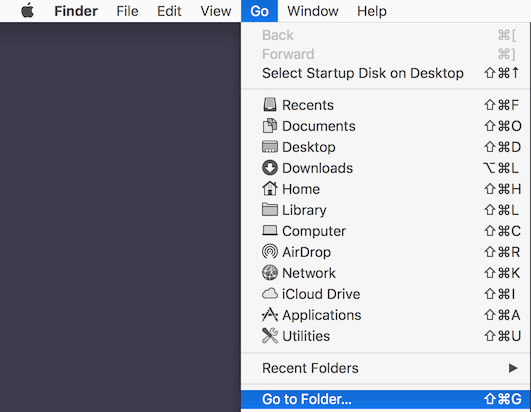
Now we will use Finder to navigate to this path to get the generated .realm database file. In your Finder, select Go > Go To Folder… (Command + Shift + G ), then paste in the path you copied just now and press ‘Go’

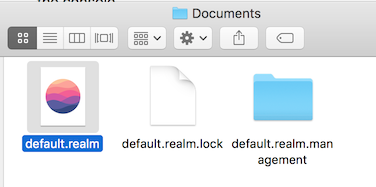
You should see the file default.realm now, copy this (you can ignore the default.realm.lock and default.realm.management stuff) to your Desktop or anywhere easily accessible as you need to drag and drop this to the actual app Xcode project, I suggest renaming the file to something more obvious, like food.realm.
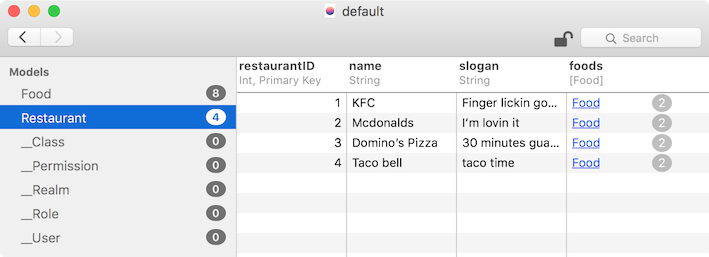
If you have Realm browser Mac app installed, you can double click the realm file to view it and check if the data is correct.
Using the preset realm file in the actual app
Now we have the realm database file, create another Xcode iOS project which is the actual app. Similar to the steps above, open Terminal, change directory to the project directory and type pod init to initialize Podfile, then include RealmSwift in it as we are using Realm database. The Podfile should look like this :
# Uncomment the next line to define a global platform for your project
# platform :ios, '9.0'

target 'csvFoodies' do
  # Comment the next line if you don't want to use dynamic frameworks
  use_frameworks!

  # Pods for csvFood
  pod 'RealmSwift'
end
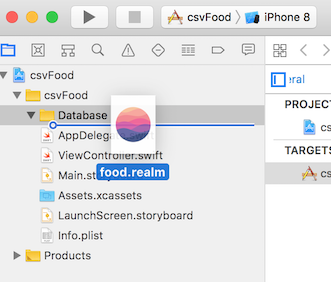
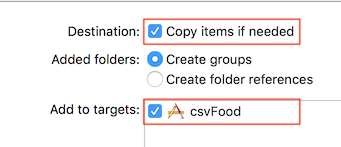
Run pod install to install the RealmSwift library. After installation, open the .xcworkspace file, and drag and drop the .realm database file into it, check Copy items if needed and check the app target.
Next, create the same Restaurant and Food model files :
// Food.swift

import Foundation
import RealmSwift

class Food : Object {
    @objc dynamic var name = ""
    @objc dynamic var price = 0
}
// Restaurant.swift

import Foundation
import RealmSwift

class Restaurant : Object {
    @objc dynamic var restaurantID = 0
    @objc dynamic var name = ""

    // slogan can be nil, as some restaurant might not have slogan
    @objc dynamic var slogan : String?

    // restaurant have many foods
    // List is used to tell Realm about one-to-many relationship
    // eg: one restaurant can have many foods
    let foods = List<Food>()

    // this function tells Realm that each restaurant is uniquely identifieable by the property "restaurantID"
    override class func primaryKey() -> String? {
        return "restaurantID"
    }
}
Next, we will create a ViewController for showing list of Restaurants, let’s name it as RestaurantViewController.swift .
To read the data in food.realm , we will access it from Bundle :
// Read the food.realm file

// realm is optional, but we will implicitly unwrap it as we know it
// will not be nil after the view is loaded
var realm : Realm!

override func viewDidLoad() {
    super.viewDidLoad()
    let realmPath = Bundle.main.url(forResource: "food", withExtension: "realm")!

    // configure to read only as file located in Bundle is not writeable
    let realmConfiguration = Realm.Configuration(fileURL: realmPath, readOnly: true)
    realm = try! Realm(configuration: realmConfiguration)
}

// yes I know there is explicit unwrap (!), the app cant function anyway without the database
(Thanks Bernardo for mentioning the readOnly option!)
Then we can retrieve all restaurants object in the Realm file like this :
restaurants = realm.objects(Restaurant.self)
The RestaurantViewController.swift code might look like this :
import RealmSwift

class RestaurantViewController: UIViewController {

    // realm is optional, but we will implicitly unwrap it as we know it
    // will not be nil after the view is loaded
    var realm: Realm!

    // to store list of restaurants
    // 'Results' is a type that is returned after executing Realm query function
    var restaurants : Results<Restaurant>?

    // to store the user-selected restaurant, for showing food of this restaurant
    var selectedRestaurant : Restaurant?

    override func viewDidLoad() {
        super.viewDidLoad()

        // Read the food.realm file
        let realmPath = Bundle.main.url(forResource: "food", withExtension: "realm")!

        // configure to read only as file located in Bundle is not writeable
        let realmConfiguration = Realm.Configuration(fileURL: realmPath, readOnly: true)
        realm = try! Realm(configuration: realmConfiguration)

        // load all restaurant objects from the realm to the array
        restaurants = realm.objects(Restaurant.self)
    }
}
Next, we will add a table view into the restaurant view controller to show list of restaurants. Creating table view and custom table view cell is out of the scope of this article, but here’s how the table view datasource might look like :
extension RestaurantViewController : UITableViewDataSource {
    func tableView(_ tableView: UITableView, numberOfRowsInSection section: Int) -> Int {
        // if restaurants array is nil, then return 0 row
        guard let restaurants = restaurants else {
            return 0
        }

        // number of restaurants
        return restaurants.count
    }

    func tableView(_ tableView: UITableView, cellForRowAt indexPath: IndexPath) -> UITableViewCell {
        guard let cell = tableView.dequeueReusableCell(withIdentifier: cellIdentifier) as? RestaurantTableViewCell,
            let restaurants = restaurants else {
            return UITableViewCell()
        }

        // get the specific restaurant in the array
        let restaurant = restaurants[indexPath.row]

        cell.nameLabel.text = restaurant.name
        cell.sloganLabel.text = restaurant.slogan

        return cell
    }
}
You should get output like this now :
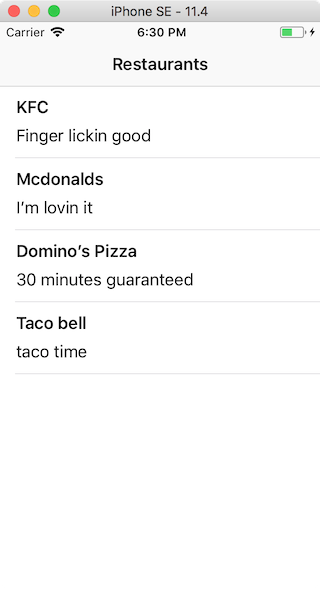
We managed to read data out from the preset realm database file! 🙌
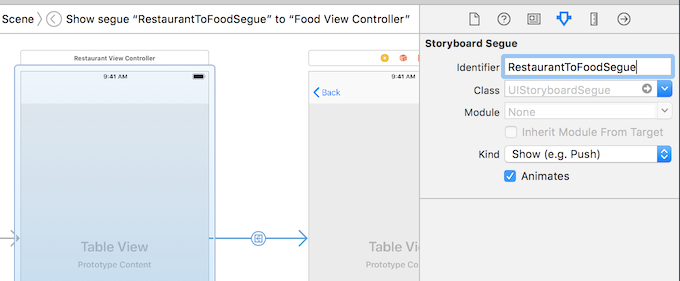
Next, we will create another view controller named FoodViewController which shows the food served by a selected restaurant. Drag and drop a new view controller into the storyboard and create a segue to it (or do it programmatically if you like), fill in the segue identifier as we will need this in code later on.
Add a restaurant property in the FoodViewController to store the selected restaurant from RestaurantViewController.
class FoodViewController: UIViewController {

    // selected restaurant
    var restaurant : Restaurant?

    // ...
}
In the RestaurantViewController, we add some code to make it that when user tap on the table view cell, it perform segue to the FoodViewController with the selected restaurant. Here’s how the tableview delegate looks like :
// RestaurantViewController.swift

extension RestaurantViewController : UITableViewDelegate {
    func tableView(_ tableView: UITableView, didSelectRowAt indexPath: IndexPath) {
        tableView.deselectRow(at: indexPath, animated: true)
        if let restaurants = restaurants {
            selectedRestaurant = restaurants[indexPath.row]
        }

        performSegue(withIdentifier: "RestaurantToFoodSegue", sender: self)
    }
}
Then in the prepareForSegue function, we set the restaurant of the FoodViewController to the selected restaurant.
// RestaurantViewController.swift

override func prepare(for segue: UIStoryboardSegue, sender: Any?) {
    if(segue.identifier == "RestaurantToFoodSegue") {
        if let foodVC = segue.destination as? FoodViewController {
            foodVC.restaurant = selectedRestaurant
        }
    }
}
Similar to RestaurantViewController, let’s add a tableview that shows food information on each of the cell. Then in the table view data source, we use restaurant.foods.count to determine how many row are there, and get food information for each row using let food = restaurant.foods[indexPath.row].
extension FoodViewController : UITableViewDataSource {
    func tableView(_ tableView: UITableView, numberOfRowsInSection section: Int) -> Int {

        guard let restaurant = restaurant else {
            return 0
        }

        return restaurant.foods.count
    }

    func tableView(_ tableView: UITableView, cellForRowAt indexPath: IndexPath) -> UITableViewCell {
        guard let cell = tableView.dequeueReusableCell(withIdentifier: cellIdentifier) as? FoodTableViewCell,
            let restaurant = restaurant else {
            return UITableViewCell()
        }

        let food = restaurant.foods[indexPath.row]
        cell.nameLabel.text = food.name
        cell.priceLabel.text = "$\(food.price)"

        return cell
    }
}
When you run the app, the Food view controller should look like this :

We have managed to create, embed and use a preset realm database in an app! 🙌
Try out the CSV to Realm Xcode Project and the Realm preset database app
Get your hands on the actual code and project, saving time from having redo everything from scratch, give it a try!
https://github.com/fluffyes/csvFoodies
