Prerequisite: You will need macOS Catalina (10.15)+ and Xcode 11+ to run Xcode Previews.
Apple introduced Xcode Previews in WWDC 2019 alongside with SwiftUI, which allow us to view UI changes immediately after each change, instead of needing to recompile the app after each UI changes.
You might think that Xcode Previews only works for SwiftUI project, but it can work on UIKit's UIViewController and UIView too! This makes coding UI programmatically a lot more attractive now with (almost) instant preview, no need to keep build and run on each changes, and you don't have to deal with slow IBDesignables in Storyboard anymore.
This article assumes that your iOS app supports iOS 12 and older, you can remove the *@available(iOS 13, ) line if your app only supports iOS 13 and newer.
Table of contents:
- How Previews work
- Wrapping UIViewController inside SwiftUI View
- UIViewControllerRepresentable extension
- Previewing multiple devices
- Live Preview
- Objective-C
How Previews work
To enable preview for a SwiftUI view, we need to create a struct which conform to the PreviewProvider protocol like this :
struct ContentView_Previews: PreviewProvider {
    static var previews: some View {
        // the SwiftUI View
        ContentView()
    }
}
When you create a new SwiftUI View, Xcode will auto generate this block at the bottom of the View code for you.
Since we are using UIKit's view, we need to wrap our UIKit View Controller inside a SwiftUI View to make it work, using UIViewControllerRepresentable protocol, or UIViewRepresentable if you are using UIView instead of UIViewController.
Wrapping UIViewController inside SwiftUI View
Say you have a View Controller like this :
// InfoViewController.swift

import UIKit

class InfoViewController: UIViewController {
  ...
}
We can create a struct which conform to UIViewControllerRepresentable, and return this view controller in the makeUIViewController(context: Context) method. This will wrap the UIViewController in a SwiftUI View.
We can leave the updateUIViewController function empty, as we don't have SwiftUI state or binding that will update the view controller in this case.
Next, we will use this struct inside another struct which conforms PreviewProvider protocol, to generate the preview :
// InfoViewController.swift

import UIKit

class InfoViewController: UIViewController {
  ...
}

#if DEBUG
import SwiftUI

struct InfoVCRepresentable: UIViewControllerRepresentable {
    func updateUIViewController(_ uiViewController: UIViewController, context: Context) {
        // leave this empty
    }

    @available(iOS 13.0.0, *)
    func makeUIViewController(context: Context) -> UIViewController {
        InfoViewController()
    }
}

@available(iOS 13.0, *)
struct InfoVCPreview: PreviewProvider {
    static var previews: some View {
       InfoVCRepresentable()
    }
}
#endif
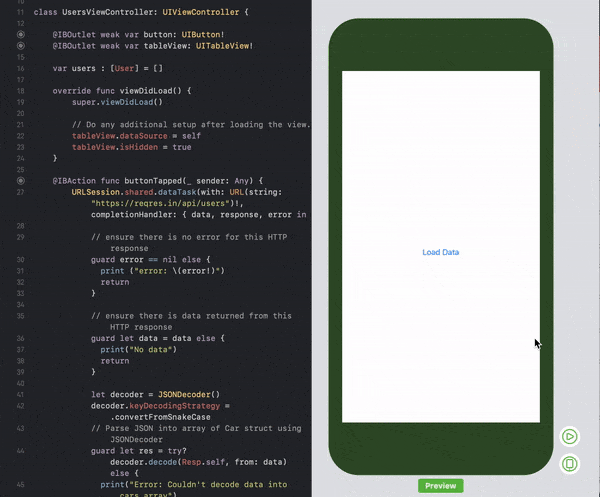
With UIViewControllerRepresentable and PreviewProvider implemented, we now can view the preview. If the preview pane doesn't show, press option + command + enter (or from the top menu Editor > Canvas) to open the preview pane.
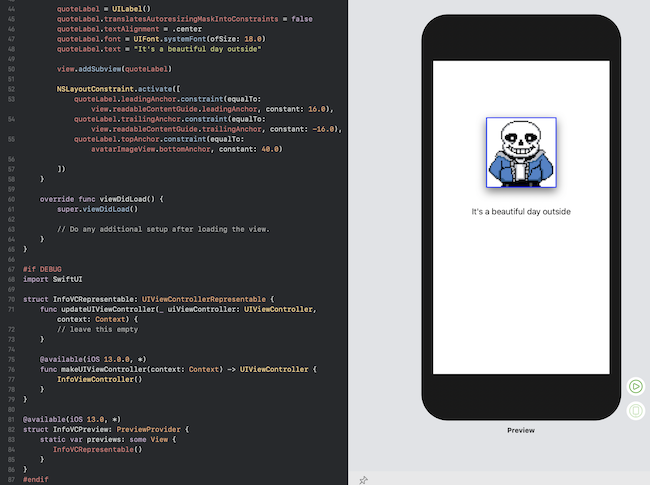
Now when you make any changes to the view controller code, you can see it reflect (almost) immediately on the preview! 🚀
The #if DEBUG and #endif macro means that the code in between them will only be included in the compiled app if the app is built for debugging purpose (eg: when built from Xcode to simulator or your phone), as we don't need the preview code in our production app (in App Store).
It can be repetitive to implement the UIViewControllerRepresentable struct for each of the View Controllers, we can create an extension for this to eliminate this repeating work.
UIViewControllerRepresentable extension
Let's create new Swift File for this extension :
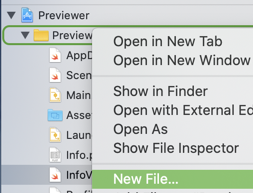
Name it as "UIViewController+Preview.swift".

Then put in the extension code like below :
//UIViewController+Preview.swift

import UIKit

#if DEBUG
import SwiftUI

@available(iOS 13, *)
extension UIViewController {
    private struct Preview: UIViewControllerRepresentable {
        // this variable is used for injecting the current view controller
        let viewController: UIViewController

        func makeUIViewController(context: Context) -> UIViewController {
            return viewController
        }

        func updateUIViewController(_ uiViewController: UIViewController, context: Context) {
        }
    }

    func toPreview() -> some View {
        // inject self (the current view controller) for the preview
        Preview(viewController: self)
    }
}
#endif
With this extension, we just need to add the PreviewProvider confirming struct below each view controllers, and use ViewController.toPreview() for the preview view.
// InfoViewController.swift

import UIKit

class InfoViewController: UIViewController {
  ...
}

#if DEBUG
import SwiftUI

@available(iOS 13, *)
struct InfoVCPreview: PreviewProvider {

    static var previews: some View {
        // view controller using programmatic UI
        InfoViewController().toPreview()
    }
}
#endif
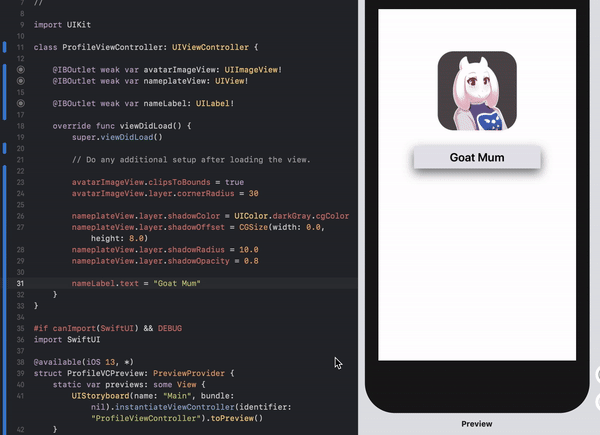
If you are using Storyboard for the view controller, you can instantiate it using the Storyboard ID.
Ensure that you have set a unique storyboard ID for your view controller :
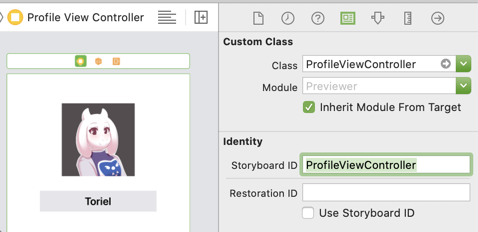
Then in the PreviewProvider, instantiate the view controller from the storyboard :
#if DEBUG
import SwiftUI

@available(iOS 13, *)
struct ProfileVCPreview: PreviewProvider {
    static var previews: some View {
        // Assuming your storyboard file name is "Main"
        UIStoryboard(name: "Main", bundle: nil).instantiateViewController(identifier: "ProfileViewController").toPreview()
    }
}
#endif
Previewing multiple devices
It would be handy if we can preview how our UI looks like in multiple devices at once. We can specify an array of devices and create preview in each of the device like this :
#if DEBUG
import SwiftUI

@available(iOS 13, *)
struct InfoVCPreview: PreviewProvider {
    static var devices = ["iPhone SE", "iPhone 11 Pro Max"]

    static var previews: some View {
        ForEach(devices, id: \.self) { deviceName in
            InfoViewController().toPreview().previewDevice(PreviewDevice(rawValue: deviceName))
            .previewDisplayName(deviceName)
        }
    }
}
#endif
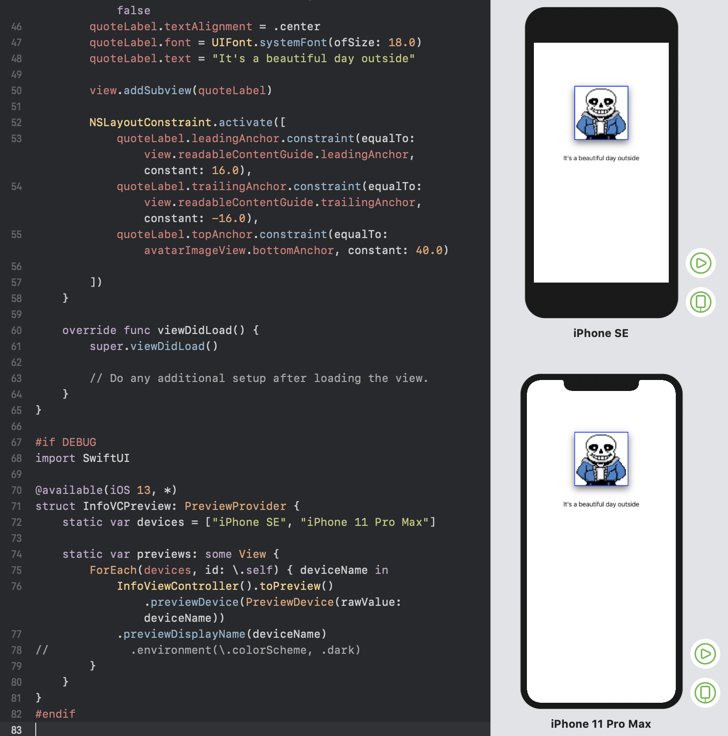
The ForEach loop will loop through each of the device specified in the devices array, deviceName is the value of the element used in the loop (eg: iPhone SE).
.previewDevice() will show the UI in the Preview Device specified, which is created in the PreviewDevice(rawValue: ) function.
.previewDisplayName() is the text that will be displayed below the device in the preview, we'll use the device name for this.
I usually use the smallest device (iPhone SE) and largest device (iPhone 11 Pro Max) for previewing UI. If the UI works on both smallest and largest devices, it most likely will look ok across all devices.
You can specify different devices like "iPhone 8", "iPhone 8 Plus", "iPad Pro (11-inch)" etc. Here is the list of supported device in Preview currently :
// The following values are supported:
//
//     "iPhone 8"
//     "iPhone 8 Plus"
//     "iPhone SE"
//     "iPhone 11"
//     "iPhone 11 Pro"
//     "iPhone 11 Pro Max"
//     "iPad mini 4"
//     "iPad Air 2"
//     "iPad Pro (9.7-inch)"
//     "iPad Pro (12.9-inch)"
//     "iPad (5th generation)"
//     "iPad Pro (12.9-inch) (2nd generation)"
//     "iPad Pro (10.5-inch)"
//     "iPad (6th generation)"
//     "iPad Pro (11-inch)"
//     "iPad Pro (12.9-inch) (3rd generation)"
//     "iPad mini (5th generation)"
//     "iPad Air (3rd generation)"
//     "Apple TV"
//     "Apple TV 4K"
//     "Apple TV 4K (at 1080p)"
//     "Apple Watch Series 2 - 38mm"
//     "Apple Watch Series 2 - 42mm"
//     "Apple Watch Series 3 - 38mm"
//     "Apple Watch Series 3 - 42mm"
//     "Apple Watch Series 4 - 40mm"
//     "Apple Watch Series 4 - 44mm"
Live Preview
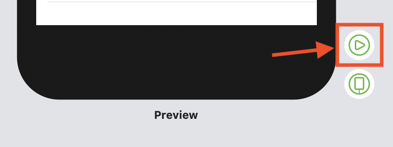
Xcode Previews only loads the initial UI by default. If you want to interact with the view controller , execute code and update the UI like in simulator, you can utilize the Live Preview button :
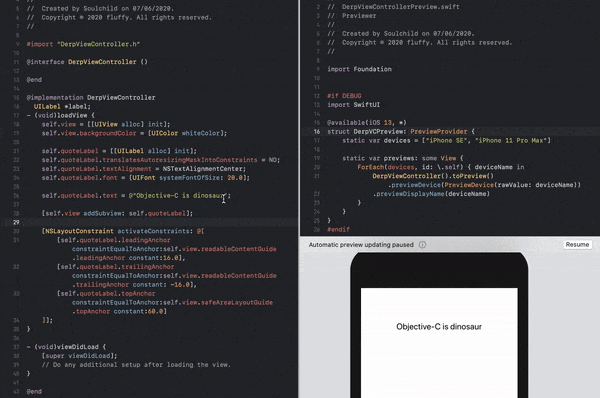
Objective-C
Xcode Previews works with Objective-C too! For simplicity, I prefer creating a new Swift file to generate the preview for the Objective-C view controller.
This section assumes you have created an extension for the ViewController UIViewControllerRepresentable as shown above (UIViewController+Preview.swift).
Create a new Swift file, I prefer to name it as "(ViewControllerName)Preview.swift", then fill in the PreviewProvider struct details :
//DerpViewControllerPreview.swift

// DerpViewController is an Objective-C View Controller

#if DEBUG
import SwiftUI

@available(iOS 13, *)
struct DerpVCPreview: PreviewProvider {
    static var devices = ["iPhone SE", "iPhone 11 Pro Max"]

    static var previews: some View {
        ForEach(devices, id: \.self) { deviceName in
            DerpViewController().toPreview().previewDevice(PreviewDevice(rawValue: deviceName))
            .previewDisplayName(deviceName)
        }
    }
}
#endif
Update bridging header file and import the view controller :
// ProjectName-Bridging-Header.h

//  Use this file to import your target's public headers that you would like to expose to Swift.
//

#import "DerpViewController.h"
Open the Preview swift file you just created, a canvas should show up (press option + command + enter if it doesn't show), you can then open another tab for the Objective-C view controller to edit it.
And now you can make change on your Objective-C view controller and preview it!