App Store has since become a race to bottom for developers in term of pricing their app, it can be very hard to convince a user to pay for an app before they even download it. Most apps in the App Store now has switched into the business model of free with in-app purchase for additional feature, this allows the user to try out the basic app function before buying the premium feature, and also increases conversion rate.
Say you already have a paid app in App Store and want to convert it into free with in-app purchase, but doing so might cause an upset of customers who have already bought it previously, as they will need to fork out money to buy the in-app purchase again. How can we check if an user has previously purchased and downloaded the paid app? and also unlock in-app purchase if the user has previously bought the app?
We can check if an user has previously downloaded the app by checking the download receipt, there's a original application version property on the receipt which indicates the CFBundleVersion number of the app that the user first downloaded using their Apple account.
This corresponds to the value of
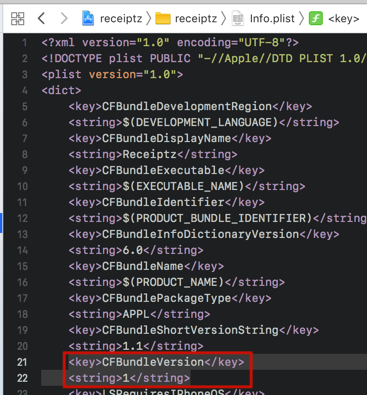
CFBundleVersion(in iOS) orCFBundleShortVersionString(in macOS) in theInfo.plistfile when the purchase was originally made.In the sandbox environment, the value of this field is always “1.0”
We will look into how to retrieve the receipt and the property below. As receipt validation is a huge topic on its own, this post will not cover the detail of validating receipt, and will just use the SwiftyLocalReceiptValidator library written by Andrew Bancroft to validate and extract data from the receipt, he has written a series of awesome articles on how to validate in-app purchase receipt, check it out!
Table of contents :
- App Store receipt
- Installing OpenSSL
- Installing Apple Root Certificate for verification purpose
- Comparing original_app_version value
- Extra: Server side receipt validation
App Store receipt
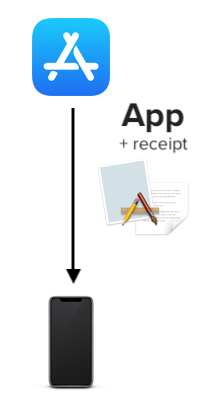
When a user downloads app from the App Store, App Store will generate an app receipt and bundle it with the app.

We can access the receipt file using Bundle.main.appStoreReceiptURL , the URL string might look like this : YourAppPath/StoreKit/sandboxReceipt. The receipt is a binary file which follow the structure of PKCS7 container, and the attributes are encoded in ASN1 format, as shown in the Apple's Receipt Validation Guide :

When we build the app using Xcode or download it using Testflight, usually the receipt is not included :

In the Xcode / Testflight build, we can manually request a receipt from the sandbox App Store by calling SKReceiptRefreshRequest.start() . I suggest creating a custom ReceiptFetcher class for handling receipt refresh, and use it to refresh receipt in View controllers / AppDelegate.
//ReceiptFetcher.swift
import StoreKit

class ReceiptFetcher : NSObject, SKRequestDelegate {
    let receiptRefreshRequest = SKReceiptRefreshRequest()

    override init() {
        super.init()
        // set delegate to self so when the receipt is retrieved,
        // the delegate methods will be called
        receiptRefreshRequest.delegate = self
    }

    func fetchReceipt() {
        guard let receiptUrl = Bundle.main.appStoreReceiptURL else {
            print("unable to retrieve receipt url")
            return
        }

        do {
            // if the receipt does not exist, start refreshing
            let reachable = try receiptUrl.checkResourceIsReachable()

            // the receipt does not exist, start refreshing
            if reachable == false {
                receiptRefreshRequest.start()
            }
        } catch {
            // the receipt does not exist, start refreshing
            print("error: \(error.localizedDescription)")
            /*
            error: The file “sandboxReceipt” couldn’t be opened because there is no such file
            */
            receiptRefreshRequest.start()
        }
    }

    // MARK: SKRequestDelegate methods
    func requestDidFinish(_ request: SKRequest) {
        print("request finished successfully")
    }

    func request(_ request: SKRequest, didFailWithError error: Error) {
        print("request failed with error \(error.localizedDescription)")
    }
}
A note before proceeding to adding code on refreshing receipt, remember to log out your Apple account from the App Store app in your iOS device, and make sure that you have sandbox tester created as real apple account can't be used in sandbox App Store environment.
In the App Store app, tap on the top right profile picture, then tap 'Log out'. Don't log in to your sandbox account here.
If you haven't create any sandbox tester account in App Store Connect yet, head over to Users and Access, and create one.

Chances are, you app already have an App ID created in Developer centre and App created in App Store connect, if you haven't already, head over to Apple developer center to create an App ID :

and then head over to App Store Connect to create an App using the App ID you have created earlier.

The steps above are necessary as Sandbox App Store won't issue a receipt if your app is not created in App Store Connect. After creating sandbox tester and app in App Store Connect, now we can proceed to refresh receipt :
// ViewController.swift
class ViewController: UIViewController {

  // receiptFetcher is defined at the class scope
  let receiptFetcher = ReceiptFetcher()

  override func viewDidLoad() {
    super.viewDidLoad()
    // Do any additional setup after loading the view, typically from a nib.

    receiptFetcher.fetchReceipt()
  }
}
The receiptFetcher instance is declared at the class level scope so that ViewController will have a reference to it as long as the ViewController exist in memory, this is required as the receipt refresh is async and takes some time to call its delegate method. If we declare receiptFetcher in viewDidLoad, it might get deallocated from memory once viewDidLoad function has finished executing, causing the delegate method not called.
Now build and run the app in your iOS device (refreshing receipt in Simulator will result in failure), you will be prompted to login, login with your sandbox tester account credential.

After logging in, the app will download the receipt from sandbox App Store.

If the receipt is retrieved successfully, the SKRequestDelegate method requestDidFinish() will be called. Once we got the receipt file, we can proceed to extract out properties from it.
Before proceeding to extracting properties from the receipt, we will need to install a few library so that we can decode the receipt into readable form, as the receipt is in binary format. Below we will install OpenSSL library needed to validate the authenticity of the receipt and also extract data out of the receipt.
Installing OpenSSL
We will be using OpenSSL library to perform validation and also the data extraction of the receipt file, we will be using cocoapods to install the 'OpenSSL-Universal' pod.
If you haven't install cocoapods yet, follow this guide to install it. Then after installation, open terminal, and navigate to your project folder root, and run pod init to generate a Podfile.
We will be using the OpenSSL-Universal pod for installing the OpenSSL library.
target 'receiptz' do
  # Comment the next line if you're not using Swift and don't want to use dynamic frameworks
  use_frameworks!

  # Pods for receiptz

  pod 'OpenSSL-Universal'
end
Then type and run pod install in the terminal, it will install and compile OpenSSL for your project. (You will need to open the .xcworkspace file instead of .xcodeproj file next time)
As OpenSSL is written in C, we will to need to create an Objective-C bridging header to access the functionality provided in the OpenSSL library.
If you haven't create an Objective-C bridging header yet, it's easy to add one as Xcode will auto create one for us if we create a new Objective-C File. Follow these steps :
Right-click on your project folder in Xcode, select New File… , then select "Objective-C File" and click Next.
You can enter any file name for this file, as we only want to trigger the Xcode auto bridging header generator with this, we will delete the objective-C file later.
After creating the Objective-C file, Xcode will prompt "Would you like to configure an Objective-C bridging header", click "Create Bridging Header".

A bridging header file will be created, inside the file, we will insert the following import statements :
// yourAppName-Bridging-Header.h
//
//  Use this file to import your target's public headers that you would like to expose to Swift.
//

#import <openssl/pkcs7.h>
#import <openssl/objects.h>
#import <openssl/sha.h>
#import <openssl/x509.h>
By importing these header files (pkcs7.h, objects.h, etc) , we can then use the functions in these files on our Swift project. For the receipt validation, these functions will be used for decryption purpose.
Installing Apple Root Certificate for verification purpose
One of the step of receipt verification includes using Apple Root Certificate to check if the receipt is actually signed by Apple (using their own private key).
To perform this step, we would first need to download Apple Root Certificate (the public key) from Apple website here : https://www.apple.com/certificateauthority/ . Select the certificate named "Apple Inc. Root Certificate".

Once you have downloaded the certificate (AppleIncRootCertificate.cer file), add it into your project bundle, and check ' Copy items if needed' and select your app as target.


Installing SwiftyLocalReceiptValidator library
Next, we will be installing the SwiftyLocalReceiptValidator library. Head over to the repository demo folder, and grab the following files :
Download them and add it to your project, remember to check 'Copy items if needed' and select your app as target.

Before moving on to the next step, let's add the pkcs7_union_accessors.h file into the bridging header file so the SwiftyLocalReceiptValidator library can access it.
// yourAppName-Bridging-Header.h
//
//  Use this file to import your target's public headers that you would like to expose to Swift.
//

#include "pkcs7_union_accessors.h"
#import <openssl/pkcs7.h>
#import <openssl/objects.h>
#import <openssl/sha.h>
#import <openssl/x509.h>
Next, we will use this library to get the "original_app_version" property value from the receipt.
Comparing original_app_version value
After installing OpenSSL library, Apple root certificate and the SwiftyLocalReceiptValidator library, now we can access the original_app_version property like this :
class ViewController: UIViewController {

  // receiptFetcher is defined at the class scope
  let receiptFetcher = ReceiptFetcher()

  override func viewDidLoad() {
    super.viewDidLoad()
    // Do any additional setup after loading the view, typically from a nib.

    // fetch receipt if receipt file doesn't exist yet
    receiptFetcher.fetchReceipt()

    // validage receipt
    let receiptValidator = ReceiptValidator()
    let validationResult = receiptValidator.validateReceipt()

    switch validationResult {
    case .success(let receipt):
        // receipt validation success
        // Work with parsed receipt data.
        print("original app version is \(receipt.originalAppVersion ?? "n/a")")
    case .error(let error):
        // receipt validation failed, refer to enum ReceiptValidationError
        print("error is \(error.localizedDescription)")
    }

  }
}
In case of successful receipt validation, we get the receipt object (ParsedReceipt struct), and can access the originalAppVersion property, it is an optional string. It is nil if the receipt doesn't contain original app version property, which almost doesn't happen.
Before comparing the value, take note that from Apple documentation,
This corresponds to the value of
CFBundleVersion(in iOS) orCFBundleShortVersionString(in macOS) in theInfo.plistfile when the purchase was originally made.In the sandbox environment, the value of this field is always “1.0”
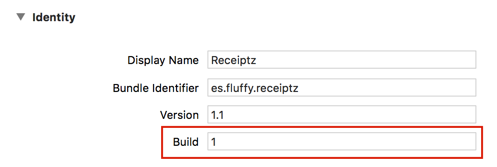
For iOS app, originalAppVersion uses the value of CFBundleVersion, which is actually the build number! (not the version number)


When you are comparing the original app version, you need to use the last build number which the app is still a paid app.
// ViewController.swift

class ViewController: UIViewController {

    // receiptFetcher is defined at the class scope
    let receiptFetcher = ReceiptFetcher()

    override func viewDidLoad() {
        super.viewDidLoad()
        // Do any additional setup after loading the view, typically from a nib.

        // fetch receipt if receipt file doesn't exist yet
        receiptFetcher.fetchReceipt()

        // validage receipt
        let receiptValidator = ReceiptValidator()
        let validationResult = receiptValidator.validateReceipt()


        switch validationResult {
        case .success(let receipt):
            // receipt validation success
            // Work with parsed receipt data.

            grantPremiumToPreviousUser(receipt: receipt)
            print("original app version is \(receipt.originalAppVersion ?? "n/a")")
        case .error(let error):
            // receipt validation failed, refer to enum ReceiptValidationError
            print("error is \(error.localizedDescription)")
        }

    }

    func grantPremiumToPreviousUser(receipt: ParsedReceipt) {
        // cast the string into integer (build number)
        guard let originalAppVersionString = receipt.originalAppVersion,
              let originalBuildNumber = Int(originalAppVersionString) else {
            return
        }

        // the last build number that the app is still a paid app
        if originalBuildNumber < 37 {
            // grant user premium feature here
            print("premium granted")
        }
    }
}
In production environment (app downloaded from App Store), the originalAppVersion will be the build number (Integer) of the app where the user first downloaded it. However in sandbox environment, Apple has set it to always return 1.0 (Double) :
In the sandbox environment, the value of this field is always “1.0”
This can be confusing for developers who didn't read the documentation thoroughly (yes I didn't read it carefully at first and spent days troubleshooting it). If we cast "1.0" into integer using Int("1.0"), we will get a nil, one of the workaround to cater to both production and sandbox environment is to cast the original app version number to a Double and compare it.
func grantPremiumToPreviousUser(receipt: ParsedReceipt) {
    // cast to Double to handle the "1.0" default value returned from sandbox
    // this also works with build number integer from production, eg: "37"
    guard let originalAppVersionString = receipt.originalAppVersion,
          let originalBuildNumber = Double(originalAppVersionString) else {
        return
    }

    // the last build number that the app is still a paid app
    if originalBuildNumber < 37 {
        // grant user premium feature here
        print("premium granted")
    }
}
Now we have successfully granted previous paid app customers premium features on the app!
Server side receipt validation
One downside of doing validation on app side is that a malicious user can tamper the receipt validation process if they have jailbrokened their iOS devices, thus obtaining premium feature even if they haven't bought it preciously. As receipt file is hard to tamper directly (since it requires signing from Apple), usually they side step the validation part by modifying the return value of the receipt validation function (eg. make validationResult always return true ).
This can put your earning at stake especially if your app / IAP has high monetary value. A safer way would be to do the receipt validation on a server, the app sends the receipt data to a server and the server performs validation and decide if it should grant premium feature to the app.
I have written a demo iOS app and server validation code to demonstrate how to send the receipt to server and validate it. You can try out the code yourself below :
