In this tutorial, we are going to replicate tableview and its dataSource and delegate properties using a vertical stackview like this :
We will implement custom functions like numOfRows, textAtRow and buttonTappedAtRow for the stack view, which mimics tableview's numberOfRowsInSection, cellForRowAt, didSelectRowAt functions.
By the end of this tutorial, you will learn how delegate works, and have some understanding on how tableview datasource and delegate works.
Before moving on, I recommend you to download the starter project, which contain the Textfield, segmented control and the blank stack view prepared, then you can follow along with this tutorial easily.
Table of contents :
Introduction
If you haven't grasp the concept of Optionals (eg: ?, !) yet, I recommend you to read the Optionals article first before reading this article. You will need to understand what does "?" mean for the paragraphs below.
Delegate pattern is very common in Apple's code, you can see it in tableview, collection view, URLSession etc.
For example in table view, you can set dataSource and delegate of table view to a view controller like this :
class ViewController: UIViewController {
  override func viewDidLoad() {
    super.viewDidLoad()
    tableView.dataSource = self
    tableView.delegate = self
  }
}
Recap on Protocol
Before explaining delegate, we first need to understand the concept of protocol . In Swift, we can define a protocol like this :
protocol Animal {
  func makeNoise()
}
Protocol specifies what methods (and/or variables) must be implemented, in the Animal protocol, there's makeNoise() method. We can conform a class to a protocol like this :
// Example below means the class Cat conforms to the Animal
// protocol, not that Cat is a subclass of Animal
class Cat : Animal {
  func makeNoise(){
    print("meow")
  }
}
Here we have declared a class Cat, and make it conform to the Animal protocol (by putting ": Animal" after the class name). When a class conforms to a protocol, it must implement all the methods mentioned in the protocol, else we will get an error like this :
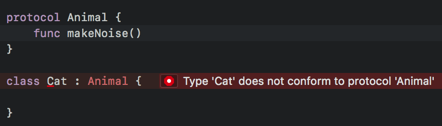
We can fix the error by implementing the makeNoise() method in the Cat class as shown previously.
This is the same when you conform your view controller to a UITableViewDataSource protocol, if you didn't implement numberOfRowsInSection and cellForRowAt indexpath method, you'll get the same error :

Here's a simplified view of UITableViewDataSource's protocol :
protocol UITableViewDataSource {
  func tableView(_ tableView: UITableView, numberOfRowsInSection section: Int) -> Int

  func tableView(_ tableView: UITableView, cellForRowAt indexPath: IndexPath) -> UITableViewCell

  // ...
}
Now you know that the basics of protocol, you might ask "whats the purpose of using protocol?" , "why do we have to force a class to implement some specified methods?" .
The purpose of protocol is abstraction, if a class conform to a certain protocol, we know that the class will surely implemented the methods specified in the protocol. This allows us to call those methods in the protocol from the class safely without knowing what exactly is the class type.
Say we have classes Cat, Dog and Fox which conform to Animal protocol :
class Cat : Animal {
  func makeNoise(){
    print("meow")
  }
}

class Dog : Animal {
  func makeNoise(){
    print("woof")
  }
}

class Fox : Animal {
  func makeNoise(){
    print("wa pow pow pow")
  }
}
We can then safely call makeNoise() for all of them :
let cat = Cat()
let dog = Dog()
let fox = Fox()

cat.makeNoise() // outputs "meow"
dog.makeNoise() // outputs "woof"
fox.makeNoise() // outputs "wa pow pow pow"

// can even put them in an array and loop like this

// an array of objects which conforms to Animal protocol
let animals: [Animal] = [cat, dog, fox]

for animal in animals {
    animal.makeNoise()
}
// outputs:
// "meow"
// "woof"
// "wa pow pow pow"
This is similar to when we use the UITableViewDataSource protocol on different UIViewController classes. You can have LoginViewController, ProductListViewController etc, as long as your view controller implement the function numberOfRowsAtSection, the tableView can access it by calling yourViewController.numberOfRowsAtSection() .
Next, we will look into how to implement the dataSource part of table view into our custom stack view.
Implementing dataSource
Tableview's dataSource is also using the same delegate concept, just different naming on the variable name.
Open the starter project, navigate to ViewController.swift, and then define a protocol for the data source, lets name it CustomStackViewDataSource, place it at the top of the file, like this :
// ViewController.swift

protocol CustomStackViewDataSource : AnyObject {
    func textForRowAt(index: Int) -> String
    func numberOfRows() -> Int
}

class CustomStackView : UIStackView {
  // ...
}

class ViewController: UIViewController {
  // ...
}
We have also set the function textForRowAt and numberOfRows for the data source protocol, these function are used by the stack view to check how many rows to create and what text to use for different rows.
The AnyObject means that only a class can conform to this protocol, struct can't conform to this protocol.
Next, we add a dataSource variable to the Custom Stack View :
class CustomStackView : UIStackView {
// always set dataSource / delegate to weak to avoid reference cycle
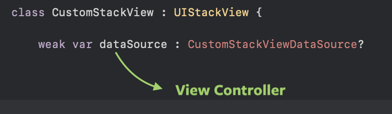
weak var dataSource : CustomStackViewDataSource?
// ...
}
This variable must conform to the CustomStackViewDataSource protocol, which means it must implement the two functions we defined in the protocol.
We have set the dataSource variable to weak, to avoid reference cycle, and weak variable must be an optional since it can be nil.
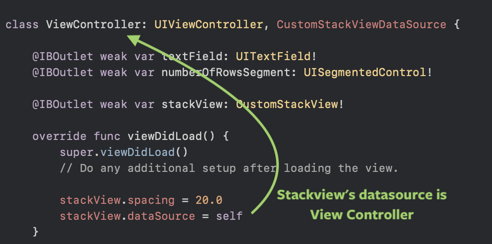
Then in the View Controller's viewDidLoad() function, we set the dataSource of the stack view to self.
class ViewController: UIViewController {
  // ...
  override func viewDidLoad() {
      super.viewDidLoad()
      stackView.spacing = 20.0

      // set the dataSource to self, which is ViewController
      stackView.dataSource = self
  }
}
Xcode will show you an error "Cannot assign value of type 'ViewController' to type 'CustomStackViewDataSource?'", because we have set the stack view dataSource to the view controller, but the view controller haven't conform to the CustomStackViewDataSource protocol yet.
Let's conform the ViewController class to the protocol like this :
class ViewController: UIViewController, CustomStackViewDataSource {
	// ...
  override func viewDidLoad() {
    //...
  }

  // MARK: CustomStackViewDataSource
    func textForRowAt(index: Int) -> String {
        // if the textField is empty, return default text
        guard let text = textField.text, !text.isEmpty else {
            return "Default text"
        }

        // else return the text field text + the row number
        return text + " \(index)"
    }

    func numberOfRows() -> Int {
        // return the selected index of the segmented control + 1
        // if user select first index, index = 0,
        // num of rows = 0 + 1 = 1
        return self.numberOfRowsSegment.selectedSegmentIndex  + 1
    }
}
We also set the value for textForRowAt and numberOfRows using the value from the TextField and selected index from the segmented control.
Next, we will implement the reloadData() function of the custom stack view, to make it behave similar to the tableView reloadData() function.
class CustomStackView : UIStackView {
weak var dataSource : CustomStackViewDataSource?
func reloadData() {
guard let dataSource = dataSource else {
return
}
// remove all the child view inside the stackview
for subview in self.subviews {
subview.removeFromSuperview()
}
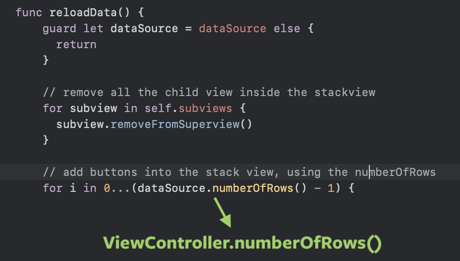
// add buttons into the stack view, using the numberOfRows
for i in 0...(dataSource.numberOfRows() - 1) {
let button = UIButton()
button.setTitle(dataSource.textForRowAt(index: i), for: .normal)
button.setTitleColor(.systemBlue, for: .normal)
button.setTitleColor(.systemPurple, for: .highlighted)
self.addArrangedSubview(button)
}
}
Now build and run the app, type in some value in the textfield, and select a number from the segmented control, and tap "Update Stack View". You will see buttons will be added into the stack view :
How does this work?
How does the data source and protocol thingy work? You might ask.
When you set the stack view's dataSource variable to self in the view controller, it means that the stack view's dataSource variable is the view controller.
Thus the dataSource of the stack view refers to ViewController.
When calling the dataSource.numberOfRows() inside the reloadData method, it is now referrring to ViewController.numberOfRows(), as dataSource is equal to ViewController.
Here's the flow of execution :
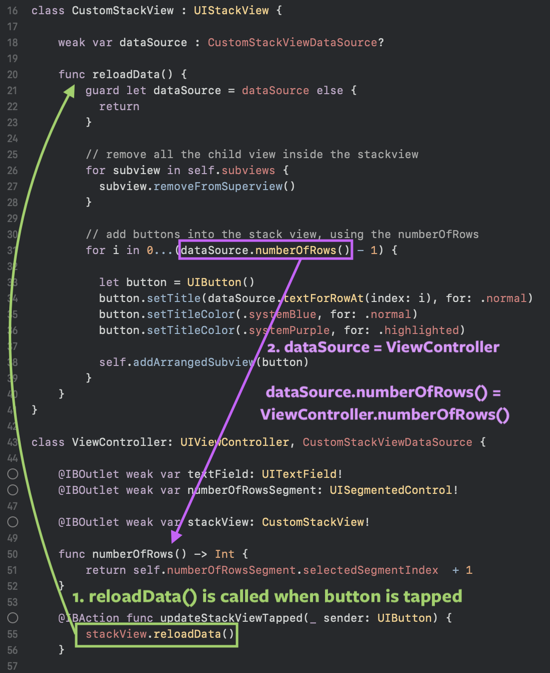
This is why the ViewController has to conform to CustomStackViewDataSource protocol, and implement the numberOfRows() method, as the numberOfRows() method will be called on it.
Similarly, textForRowAt() method has the same flow too.
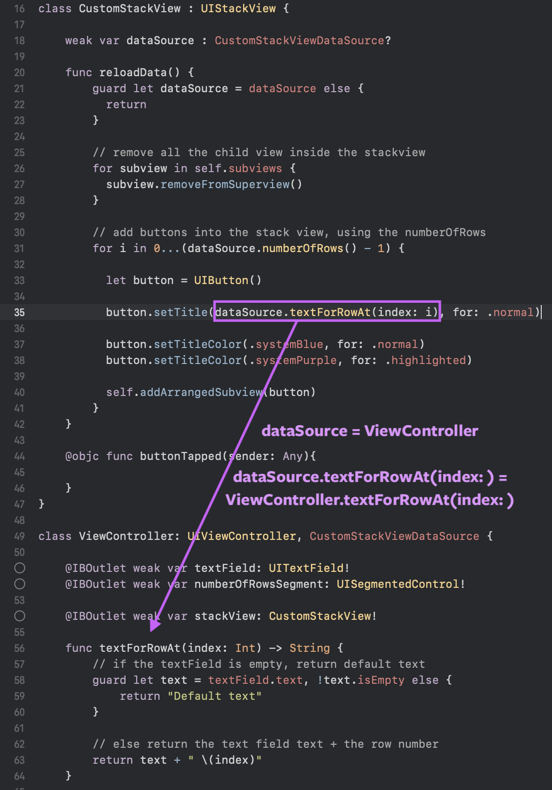
Table view datasource works similarly, when you call tableView.reloadData(), table view will call the data source (usually the view controller) 's numberOfRowsInSection and cellForRowAt function to retrieve how many rows the table view should have and the cell content for the row.
Implementing delegate
Next, we are going to implement delegate to detect action when the button in the stack view is tapped.
Similar to CustomStackViewDataSource, we will create another protocol for the delegate like this :
// ViewController.swift

protocol CustomStackViewDataSource : AnyObject {
    func textForRowAt(index: Int) -> String
    func numberOfRows() -> Int
}

// add this new delegate protocol
protocol CustomStackViewDelegate : AnyObject {
    func buttonTappedAt(index: Int)
}

class CustomStackView : UIStackView {
  // ...
}

class ViewController: UIViewController {
  // ...
}
The buttonTappedAt(index:) function will be called when we tap on one of the buttons in the stack view, with the index parameter indicating which row of the button we have tapped.
Next, in the CustomStackView class, we add another variable to be the CustomStackViewDelegate :
class CustomStackView : UIStackView {

    weak var dataSource : CustomStackViewDataSource?
    weak var delegate : CustomStackViewDelegate?

   // ....
}
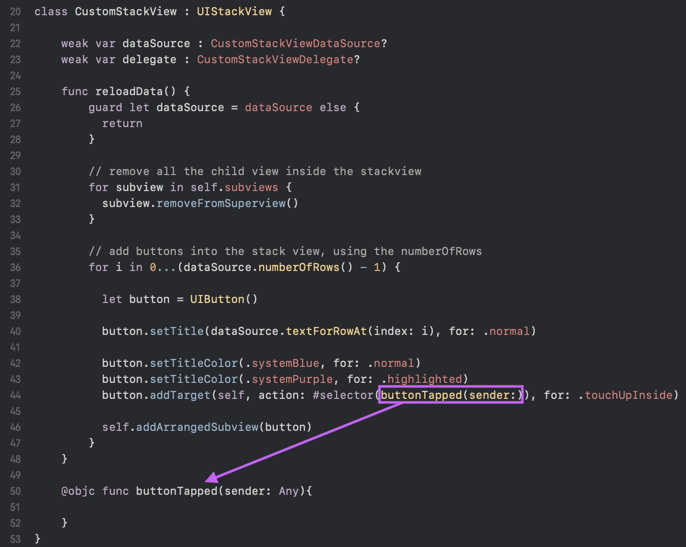
Then inside the reloadData() function of the CustomStackView, we want to add action for the button we insert into the stack view. So that when they are tapped, the buttonTapped() function will be executed.
// inside class CustomStackView
func reloadData() {
    guard let dataSource = dataSource else {
      return
    }

    // remove all the child view inside the stackview
    for subview in self.subviews {
      subview.removeFromSuperview()
    }

    // add buttons into the stack view, using the numberOfRows
    for i in 0...(dataSource.numberOfRows() - 1) {

      let button = UIButton()

      button.setTitle(dataSource.textForRowAt(index: i), for: .normal)

      button.setTitleColor(.systemBlue, for: .normal)
      button.setTitleColor(.systemPurple, for: .highlighted)

      // execute the "buttonTapped" function declared below when the button is tapped.
      button.addTarget(self, action: #selector(buttonTapped(sender:)), for: .touchUpInside)

      self.addArrangedSubview(button)
    }
}

@objc func buttonTapped(sender: Any){

}
The current buttonTapped function doesn't do anything, we will come back to implement it later. Now, we will set the stack view delegate to view controller, and implement the buttonTappedAt(index:) function.
class ViewController: UIViewController {
  // ...
  override func viewDidLoad() {
      super.viewDidLoad()

      stackView.spacing = 20.0
      stackView.dataSource = self

      // set the delegate to self, which is ViewController
      stackView.delegate = self
  }
}
At this point, Xcode will show you an error because your view controller haven't conform to the CustomStackViewDelegate protocol yet. To solve this, we will conform the view controller to the protocol and implement the delegate function :
class ViewController: UIViewController, CustomStackViewDataSource, CustomStackViewDelegate {
	// ...
  override func viewDidLoad() {
    //...
  }
  // MARK: CustomStackViewDataSource
  // ...

  // MARK: CustomStackViewDelegate
  func buttonTappedAt(index: Int) {
      print("tapped at \(index)")
  }
}
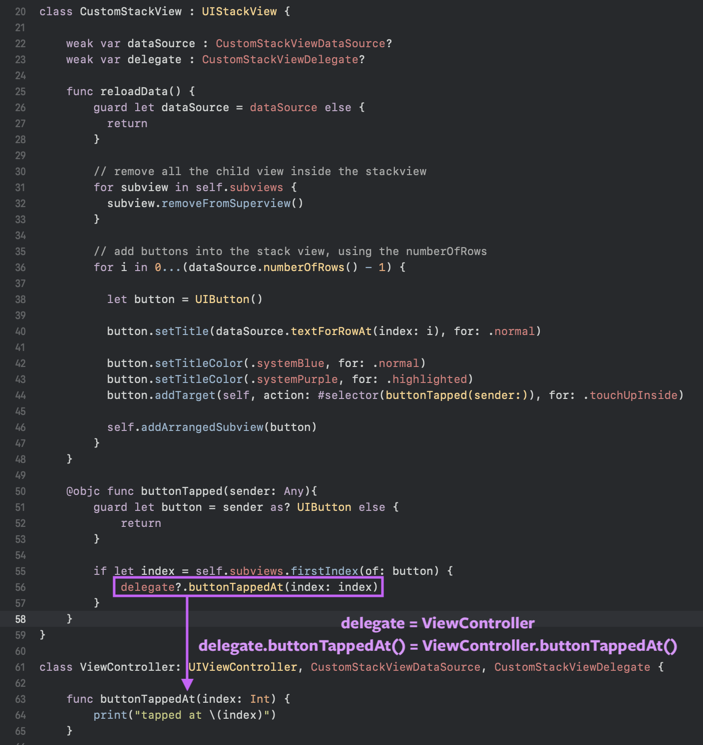
Now that we have implemented the buttonTappedAt protocol method in ViewController, let's move back to the buttonTapped() function the of CustomStackView, and implement the buttonTapped(sender:) function.
class CustomStackView : UIStackView {
  // ....
  @objc func buttonTapped(sender: Any){
        // ensure the sender (the UI that was tapped) is a button
        guard let button = sender as? UIButton else {
            return
        }

        // get the index of the button tapped from the stack view
        // buttons are subviews of the stack view, from top to bottom
        // we get the index of the button here
        if let index = self.subviews.firstIndex(of: button) {
            // and then call the buttonTappedAt with the index retrieved
            delegate?.buttonTappedAt(index: index)
        }
    }
}
And here is how the flow works, when a button inside the stack view is tapped :
Build and run the app, when you tap on the button, the delegate function will be executed, and you see the output on the console like this :
Table view delegate works similarly, when you tap a cell in table view, table view will call the delegate (usually the view controller) 's didSelectRowAt function.
I hope you have a clearer picture on how delegate / dataSource works after reading this tutorial. Delegate isn't some magical pattern, it is just a variable referencing a ViewController or other object, then you just call the method on that variable.
You can download the completed sample delegate project here for double checking.
