Making Sense of Auto Layout Series
Chapter 1 / Chapter 2 / Chapter 3 / Chapter 4 / Chapter 5 / Chapter 6
This is the third part of Making Sense of Auto Layout Series.
Previously, we have explained how Auto Layout calculates view position and size. In this post we will look into why Xcode shows you red lines when designing layout and how to solve them.
Xcode shows you red line in the Interface Builder (the place where you drag and drop view controller in storyboard) when it doesn't know where it should place the view or/and what size is the view.
Lets use a simple example :

The gray view has 2 constraints placed :
- Width is 240
- Height is 120
The size of it is defined but there is red line surrounding it, it means that Auto Layout Engine doesn't know where to position it. We can troubleshoot what are the missing constraints by clicking the white arrow icon inside red circle button :

When you click on the missing constraints error, it will highlight the view that has missing constraint on Xcode.

You will see that Xcode complain that it needs constraints that allow it to calculate the X position and Y position of the view. Remember Auto Layout Engine needs to know / able to calculate a view X position, Y position, width and height to render it correctly?
But there is no constraint that can let the Auto Layout Engine calculate the X position and Y position. Thats why Xcode surrounded the view with red lines to get your attention (oh you) to fix it.
There's many way to fix it (refer to examples in this post), the simplest way to fix it is adding a top and left constraint like this :

After adding constraint, you will see those red line changed into blue line because Xcode now know where to position the view, yay!

Auto Layout Engine now know that the view X position is 40, Y position is 40, width is 240 and height is 120. Hence it will render it nicely across devices like this :

Summary
The example only used 1 view and I know that your app will surely have more than 1 view, but the cause of Xcode showing you red lines will always be that Xcode / Auto Layout Engine doesn't know what size is your view or where to place your view.
Always add enough constraints to all the views so Xcode / Auto Layout Engine can know or able to calculate what size is your view and where to place your view.
In the next post, we will look into how to solve conflicting constraints (when Xcode show you red lines with numbers around your view).
“dude… wow… good job on this Auto Layout book! One of the best explanations I’ve read!” – Alex Kluew
Homework exercise
I have prepared a Xcode project with some missing constraint, you can download it here.
This project contain only one view controller in the storyboard, like this :

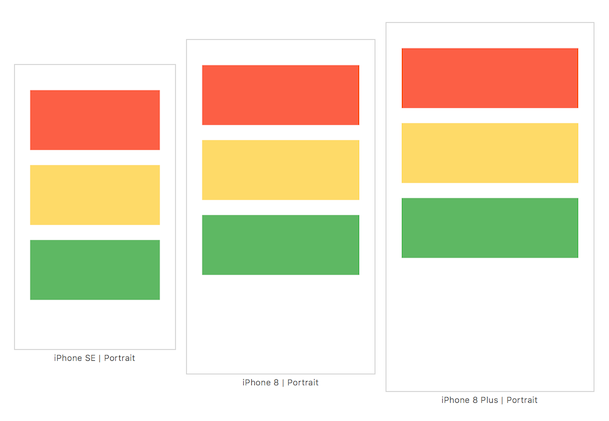
There are three views and all of them have some constraints missing, your task is to add those missing constraints so that they look like this in iPhone SE, iPhone 8 and iPhone 8 plus :
Tips :
You can view the layout for all of these devices (iPhone SE, 8 and 8 plus) in Xcode without running it in Simulator. You can add a preview view like this :


In the preview view, click the + button on the bottom left to add device :

You can check the answer of this exercise here, be sure to attempt it first before checking answer!
